"Warner AEW" Avenger conversion
[ page 1 ]
TBM-3W "Warner" Avenger model kit in 1/32 scale (conversion) by Meindert de Vreeze.
Dutch Naval Air Arm (Marine Luchtvaart Dienst MLD)
Page 1
Page 2
Page 3
Page 4
The Trumpeter 1/32 scale kit #02234 of the Grumman Avenger TBM-3 is a very good kit and comes with an impressive number of parts in 16 sprues including some photo etched parts.
The lower fuselage bay can be displayed open and stores are provided like a fuel tank, torpedo or 500 lb bombs. The wings can be folded and the visible details are all there. Moving surfaces are also provided including trailing edge flaps fine with metal hinges and shafts. Rubber tyres and a tiny photo negative instrument panel is also in the kit. The Trumpeter kit instructions are very large with 28 pages and 61 construction steps and comes with a colour profile for the scheme.
During assembly, you create various sub-assemblies such as an impressive engine, interiors and the gun turret. It all adds up to a very nice representation of the Avenger. Thankfully, most parts have a pretty good fit and this should not stop any modeller on making this nice Avenger in this large scale!
The kit was build earlier as a TBM-3S2 Killer, see here for conversion report.
This particular model will be converted into a TBM-3W Warner AEW variant, an Avenger for Airborne Early Warning with a large radar. I opted to create a couple of masters for the parts and duplicate them in resin.
NOTE: the radar fairing could also be used for a Skyraider AEW conversion in 1/32 scale as they were similar.
 ...
...  .
.
More details later.
Let’s look first briefly at the type’s history.
![]()
The Grumman’s
TBF Avenger was one of the most successful naval aircraft of the second
world war and was also deployed by various air arms after the war. First
flown in 1941, various versions were produced. All the versions have their
own typical characteristics and external differences. Almost 10,000 planes
were eventually built.
One of the famous
Grumman Avenger versions was the TBM-3W “Warner”. In the Second World War
it was realised that detecting attacking aircraft, particularly flying
at low level, required the use and installment of radar in a flying aircraft.
The MIT in the United States started experiments as early as 1942 and the
result was the S-band APS-20 radar. The Avenger was a logical choice as
airframe as it had enough room inside to accommodate the bulky equipment.
So the TBM-3W became the world’s first AEW aircraft. The radar had a range
of about 100 km. All armor, guns in the wings, gun turret and bombing systems
were deleted and the radar was installed below the fuselage in a fiberglass
radome. Other equipment were VHF radio sets, and even a primitive IFF.
To improve stability, four small fins were fitted on the stabilizer. The
radar operator was situated in the lower rear fuselage and below a new
back fairing that replaced the “glass house” with the pilot up front.
The prototype
TBM-3W flew August 5, 1944. Although envisaged for fleet protection, particularly
from Kamikaze attacks, the war ended before Warners were operationally
deployed. After the Second World War in 1946 the US Navy put the Warner
planes into service. The TBM-3W2 was a version with an updated APS-20 radar.
They served with the US Navy until the mid fifties when they were replaced
by the Grumman Guardian and Douglas AD Skyraider.
The Warner
was also exported to various countries, including The Netherlands, Canada,
France and Japan.
Data TBM-3W: Wright Cyclone R2600 14 cylinder engine with 1900 hp take-off power; empty weight about 4850 kg, max take-off weight about 7600 kg, cruise speed 240 km/hr, max speed about 420 km/hr; span 16,52 m, length 12,48 m.
Warners could have different rear doors (large or small), tail hook configurations (inside or external), antenna layouts and various rear window options. Check photographs for your particular plane to model.
The Royal Dutch
naval air service (MLD) used the Warner from September 1953 till May 1961.
These Warners appeared in various colour schemes. Within the Dutch MLD
two main schemes were used:
(1) Overall
Gloss Sea Blue FS25042 (similar to US Navy scheme)
(2) Extra Dark
Sea Grey upper surfaces with Sky lower surfaces (similar to British FAA
scheme).
I was interested
in a model of the Dutch Fleet Air Arm (MLD: Marine Luchtvaart Dienst) as
they also used the TBM-3W Warner after the war in various roles. Details
vary between MLD Warners, depending on the period and particular plane,
so study pictures when you can.
![]()
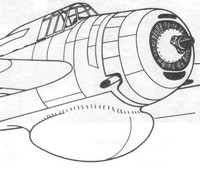
What conversion
work is necessary and what is the most logical sequence to follow?
The TBM3-3W has a couple of specific
characteristics:
[A] large radar dome
[B] faired belly fairing
[C] closed upper rear back
[D] no armament
[E] internal or external tail arrestor
hook
[F] antennas
[G] four smaller fins on stabilizer
![]()
Starting
the Warner kit build.
The modelling a model of the TBM-3W Warner requires adding a radar, a changed lower fuselage belly profile, changed rear back profile and additional fins.
These parts were home made with resin, after making masters, rubber moulds and a lot of work. Masters were made using drawings, looking at pictures through various angles and also smaller models in 1/48 and 1/72 scale.
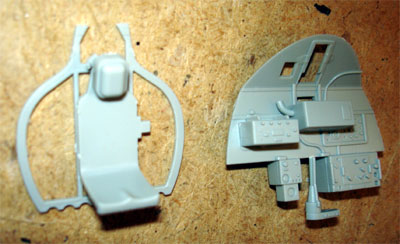
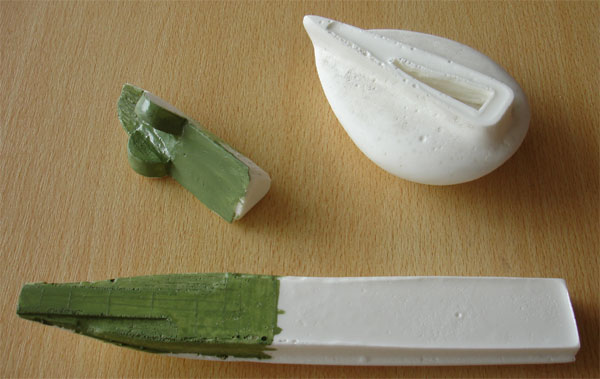
Resin parts
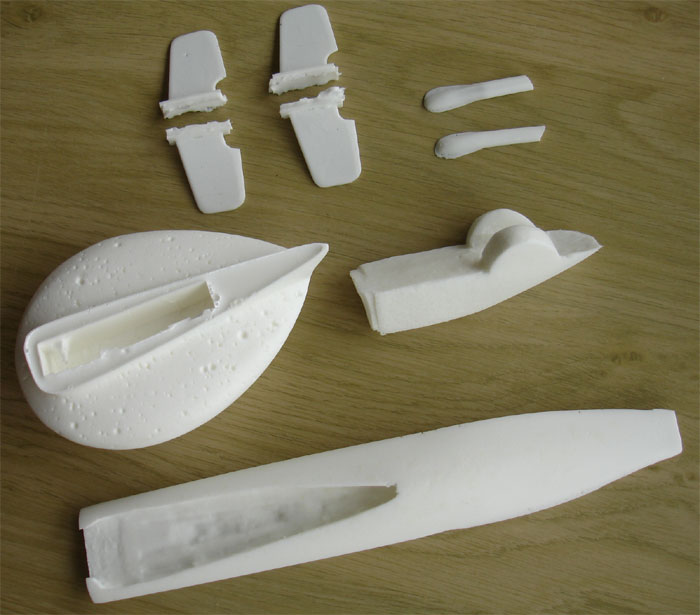

SAFETY first:
when cutting and sanding resin parts, use hand gloves to avoid skin irritation,
plenty of water and a face mask to avoid inhaling resin dust.
With the hobbyist resin pouring process, air bubbles are unavoidable.NOTE: the radar fairing could also be used for a Skyraider AEW conversion in 1/32 scale as they were similar.
So any air bubble gaps are to be filled in the resin parts, particularly the large radar dome.
Filling the holes can be done with putty or for very small holes TAMIYA putty is recommended as it adheres well to the white surfaces.
All surfaces of the resin parts were sanded smooth as well on the belly back rear fuselage back prior to fitting. This is much easier now done.
Some small additional items can be made from plastic card by the modeller and the spares box.
![]()
This modelling
report will briefly describe the modifications done to the Trumpeter model.
Numbered sections (x)
denotes
the conversion re-numbered step, the [Tx]
the related Trumpeter instructions step number.
As the weight of the resin parts is
high, also a metal Avenger gearleg set from G-Factor was purchased
for additional strength. They also provide the rear tail wheel strut.
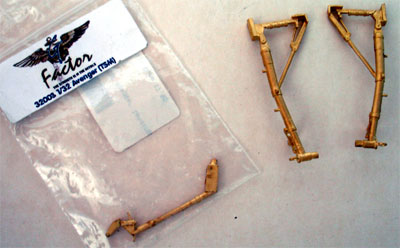
(Also Scale
Aircraft Conversions set 32009 can be purchased for the two
main gear metal legs)
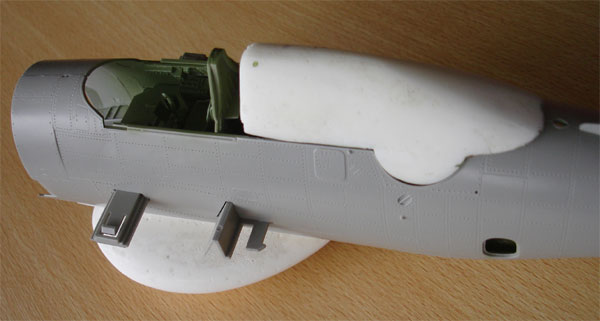
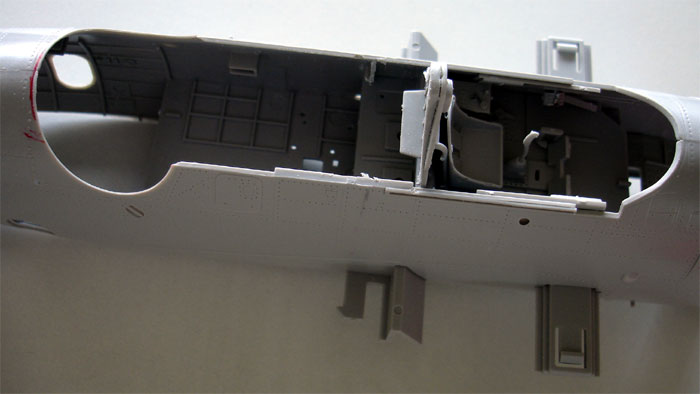
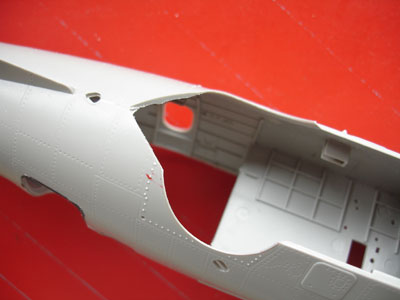
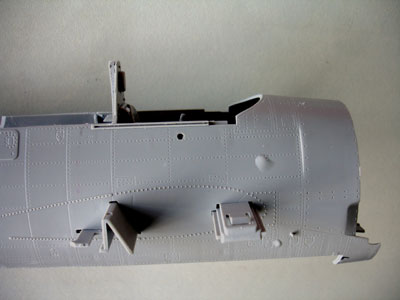
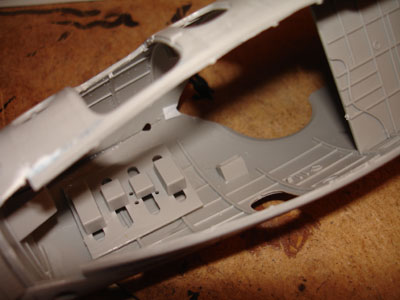
(1) Preparation
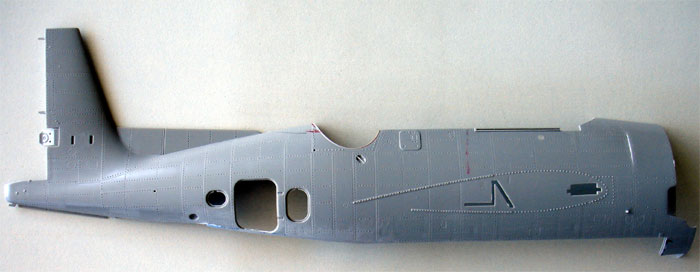
The first step is to do the major
saw work on the two fuselage halves for the re-profiled belly section.
This needs a straight cut with a razor saw on each fuselage halve, a ten
minute job.
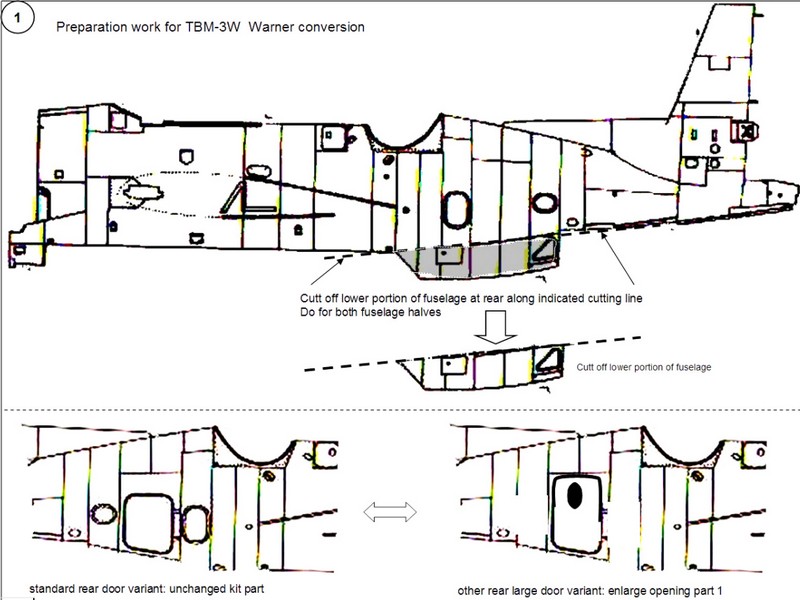
The result.......
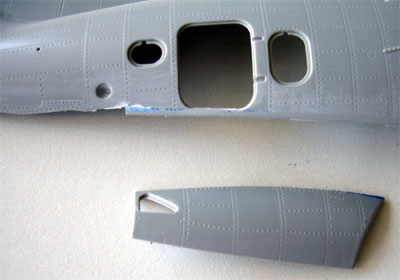
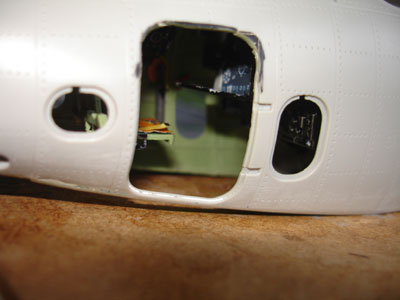
The next thing that might be done
is to enlarge the right rear fuselage crew entry door if desired. This
depends on the particular Warner to be modelled as also Warner were seen
with the standard Avenger door. So this optional.
![]()
Next step was continueing with the
model as usual with all models.
(2-5) [ T1 to
T4 ]
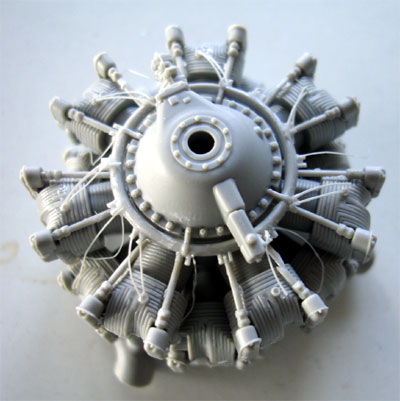
The Wright Cyclone R-2600 engine
is accurately portrayed in the kit and assembled. Some details were added
like electrical lines from stretched sprue. I had the impression that there
are too many parts D27 and how the piping runs is a bit tricky. You won't
see a lot of the engine in the dark cowling.
The engine was later on sprayed black
with dark metallic cylinder heads.
In step 4, the engine was NOT yet
fitted on the bulkhead but set aside.
The accessoiries pack with oiltank can be assembled as well, but also can be left out as hardly anything is seen of it. I left them out.
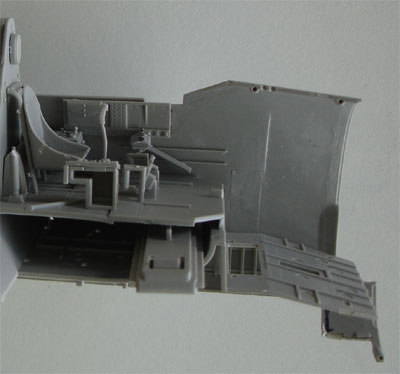
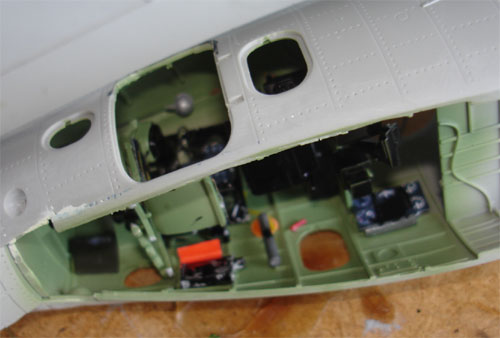
(6-10) [T5-T8]
The interior build is simplified
for the Warner as a lot of the interior is not needed. The rear interior
details are left out as well as the whole turret assembly. No particular
info was found on how the TBM-3W interior should exactly look like, so
it may not be completely accurate for this model. But who will know and
see it?
Assemble the pilot interior as per kit. The rear bulkhead parts #F2, H10, G68, G70 are not needed.
The engine was as noted NOT yet fitted
to the bulkhead. Dryfit the fuselage further for checking.....
Also a small area at the rear (wedge
shape) was removed to have a better fit of the resin back fairing....
(11-12) [T10,
T11]
Assembly of the forward interior
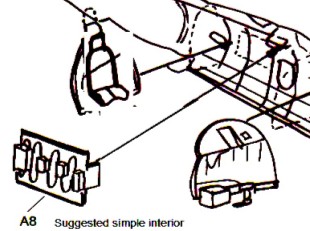
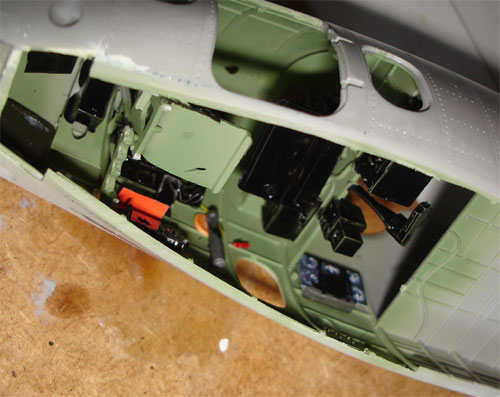
(13) Radar operator
area
When the rear crew entry door is
left open, it may be worthwhile to suggest a simple radar operator station.
This can be done using some parts in the kit although the exact lay-out
is not known. However, not a lot of it will be seen anyway.
Some suggestions are seen here....

 .
.
(14) [T23]
Major interior
The bomb/torpedo bay also needs none
of the details for the Warner. The floor is retained for strength and support
for the pilot cockpit interior.
This deals with the instrument panel
and cockpit interiors and was simply assembled. The model is well detailed.
Also paint at this stage.
(15) [T28 ]
tail wheel
The tail leg was assembled, but without
the forward bulkhead #B10 and no gun (see note on radar operator interior).
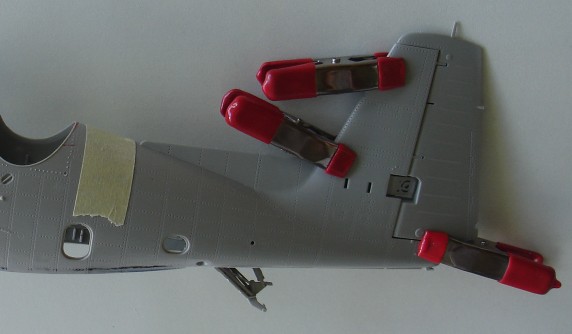
(16) [T29 ]
The arrestor hook on the TBM-3W Warner
as on other Avenger variants can be internally or externally fitted.
I used the tailhook #H18 only for
an external hook. The moulded ridge on the kit parts was sanded flat below
the aft fuselage.
A tiny fairing below the aft fuselage
from a piece of plastic will be installed as well.

(17-18-19) [T33]
Radar operator interior
Some parts were fitted now
Now both fuselage halves were merged.
Depending on the arrestor tailhook configuration, include the internal
hook when desired.
.
.
At the radar operator station, some
additional bits were also added and painted. The interiors is probably
coloured "interior green".
(HUMBROL Authentic
HD5 paint, or green Xtracolor X117 or Humbrol 151 enamel can be used. )
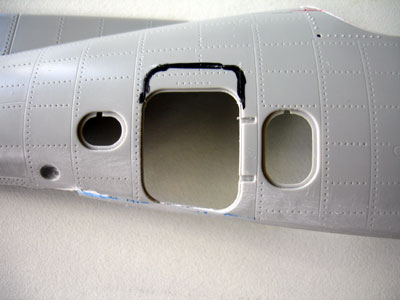
.
Note the enlarged door (optional)
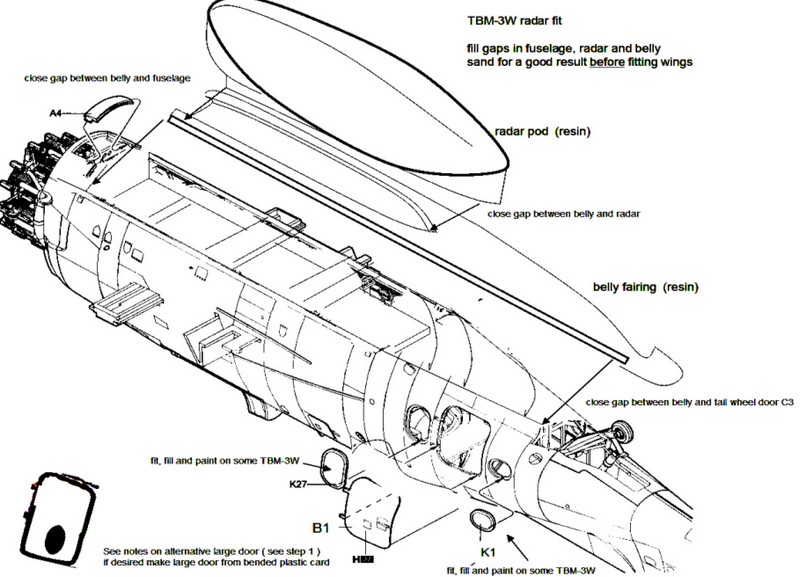
(20-21) Belly
area and Radar dome
The resin belly part and radardome
are moulded in such a way that sanding is minimal. You will need some work
on filling the airbubble holes in the resin as noted before. However, lots
and lots of filling the tiny air bubble holes is required. Most of this
filling work was done at this stage.
The main resin parts are seen here,
with the interior areas painted interior green.
The radar will fit without a lot of
effort, it was simple pushed into the belly part recess hole.
First do a dry fit, making sure it
is symmetrical. Some limited sanding may be needed here. When OK, it was
superglued in place and the gap between the belly part and the radar were
filled as well and sanded.
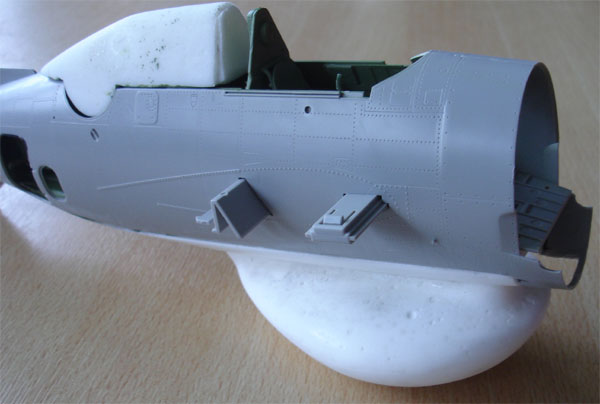
(a dry fit seen above )
The belly plus radar was set in place
in the lower fuselage (that already has some cuts in the beginning for
the Warner fitting).
Also close the gap between the radar/belly at forward area with card and putty. Sand smooth.
On some Warner planes, rear windows #K1, K2, K26, K27 may vary. Fit and/or fill/paint over as needed for your particular plane. Making a new larger door from plastic card may be needed, depending on the desired large or small door configuration.
On to next
[ Page 2.... ]
References
- 85 jaar Marineluchtvaartdienst in beeld, P. Korbee, 2002 , Very nice book in Dutch
- 70 jaar Marineluchtvaartdienst, Nico Geldhof, Uitg Eisma, 1987 , Very nice book in Dutch
- TBM-3 Avenger, Nico Geldhof, Dutch Profile, 2008 , in Dutch with English summary
- IPMS The Netherlands, NedMil website (restricted)
Back to 1/32 scale Models.......

(c) Copyright Meindert "designer"/ All rights reserved. Your comments are welcomed by webmaster