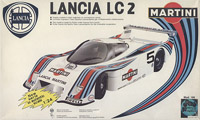
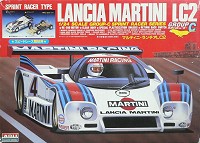
Protar 1/24 Lancia LC2

| In any decent collection of 1/24 Group-C endurance racers, the Lancia LC2 should be included. And so I bought the Protar kit, knowing that the quality would be a lot less than the usual Tamiya kit. And I wasn't disappointed - read and weep..
|
Kit versions
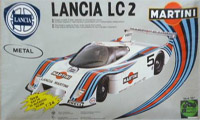
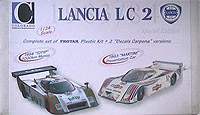
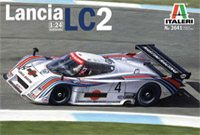
I have the all-plastic version that was issued early 1984 (catalog number 186). It was also available with a metal body version, in a silver instead of white box (catalog number 187). Around 2003, the model was also repackaged by Portuguese/French decal maker Colorado with two of their decal sheets. The only information I found on this version was posted in an Automotive Forums thread. Italeri reissued the model in October 2019. Two months later a version for the Japanese market was also issued.
| 
| 
| 
| 
|
| Protar 186 (1984)
| Protar 187 (1984)
| Colorado / Carpena (~2003)
| Italeri 3641 (2019)
| Italeri 3641 (2019 Japan)
|
Kit description
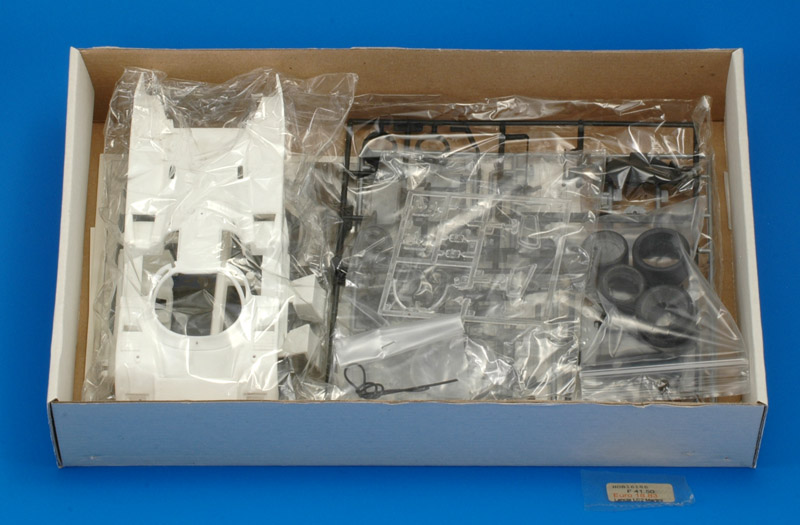
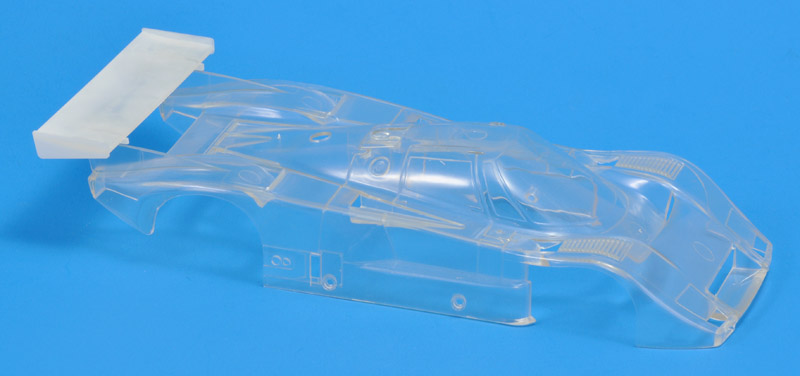
Shown here is are the contents of a second Protar box that I bought much later. I repackaged the tires immediately after the purchase because they are of the plastic-eating type. Also shown is the original price tag of "F 41,50" or 18.83 euros.
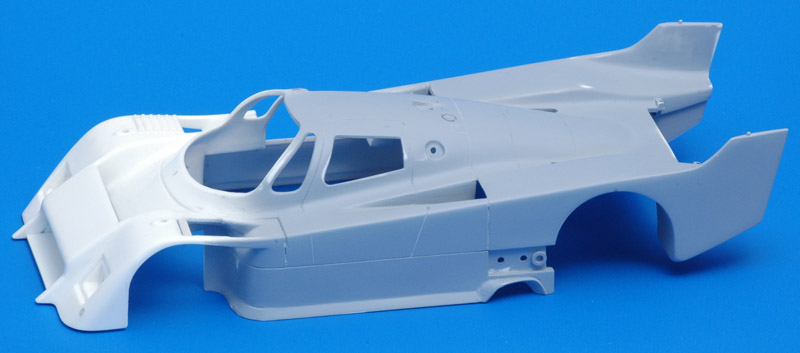
The kit depicts the 1983 season car, and you cannot build the 1984 version without substantial modifications, let alone the 1985 and later cars that have much wider bodywork. Because decals for the Pirelli tires are included, one could say that the kit represents the cars from either the Monza or Silverstone races, the first two of the season. Since the cars had a three-element rear wing at Silverstone, and the kit has a two-element rear wing, you could say it represents the Monza race.
The model could be based on the mostly-but-not-completely finished 'presentation car' that was shown in Turin, in the Martini Museum in Pessione. This was early February 1983, before the start of the season. The box art photo is a press photo from around the same time. The car in the photo (and thus box art) lacks the slanted lower edge of the sides, exhaust shield and mirrors. The race number '5' was airbrushed on the photo, deleting the 'MS' (Martini Sport) lettering in the original photo. Another 'MS' logo, on the bottom of the nose inlet opening, was obliterated by the 'New serie in authentic scale 1/24' yellow text 'balloon'. I have no idea why that 'MS' logo was such a taboo, while 'Martini' is all over the model and the box..
| 
|
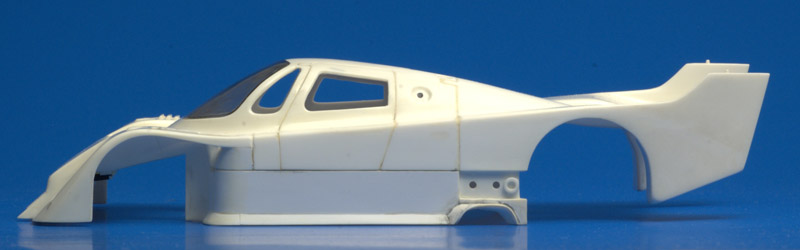
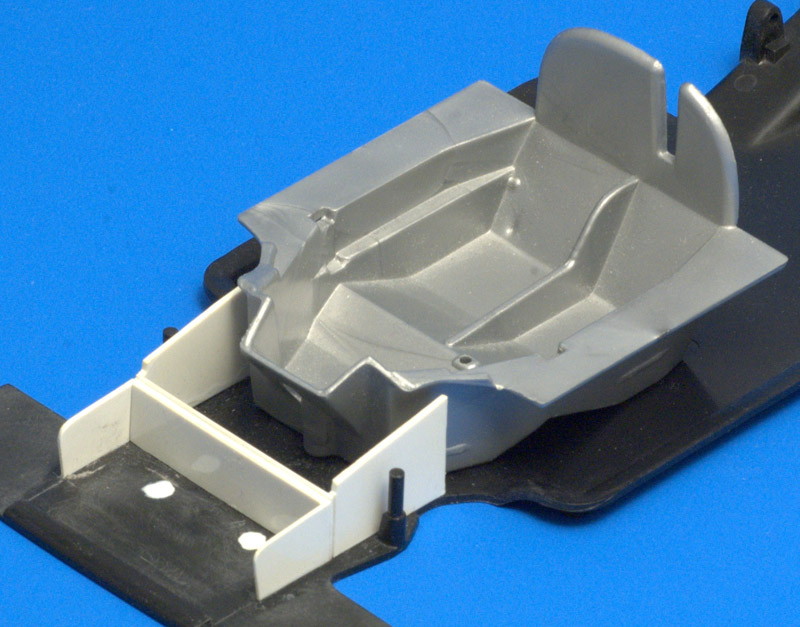
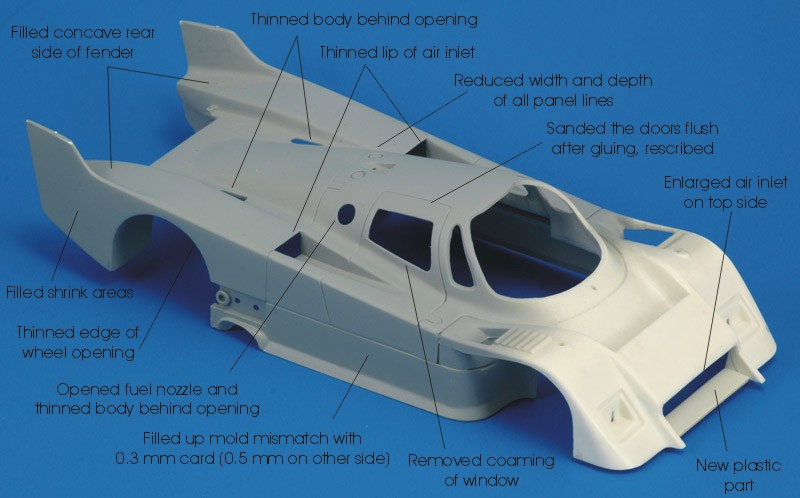
| The kit contains few parts, and on the whole it feels toylike. The single-piece body is very thick, probably so the metal version could be produced in the same mould. I measured 2 to 2.5 mm wall thickness, whereas a random Tamiya body (935-76) is 0.8 to 1.0 mm thick. The plastic of the body is rather hard compared to other kits.
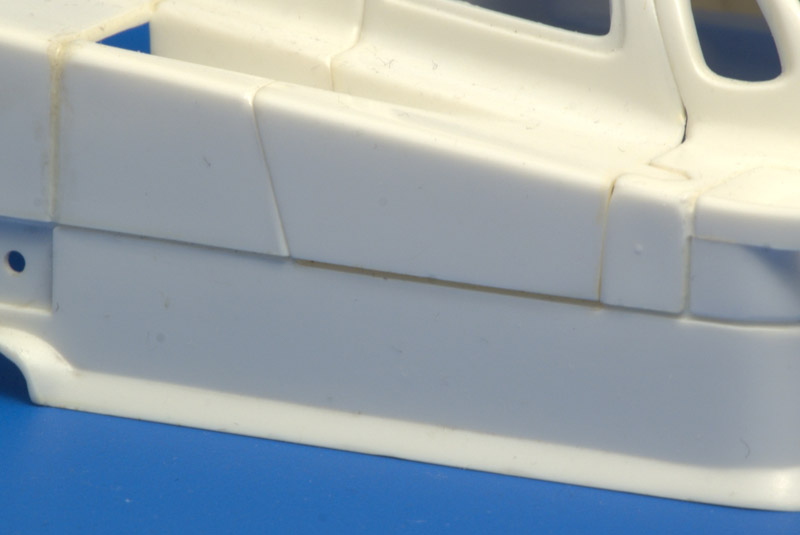
The body is clearly made in a slide mold, but that slide mold did not work well, resulting in a really bad step in the sides below the doors (see the construction photos below). The body has opening doors.
|
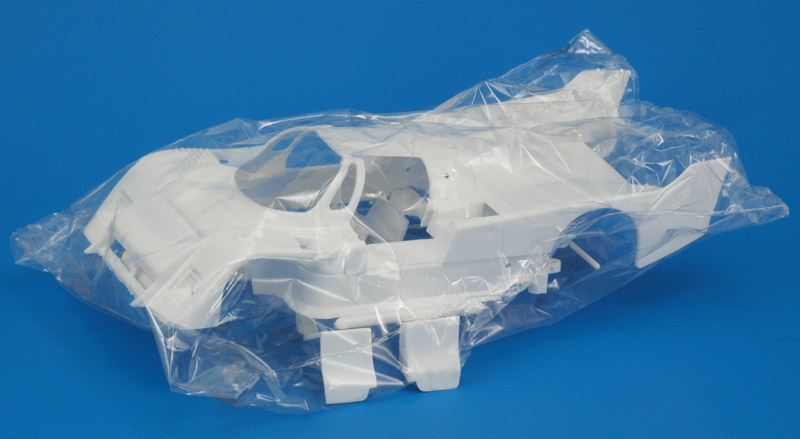
| The two main sprues are shown here. The cockpit is reasonable detailed, with a chassis tub, seat, instrument panel, steering wheel, pedals and accessories. There is no engine, gearbox or suspension. The rear wheels fit on a metal axle, the front wheels are steerable, but the pivot points are placed far inboard so the wheels turn unrealistically. The Protar model has a 110 mm wheelbase, 1 mm too short.
| 
|

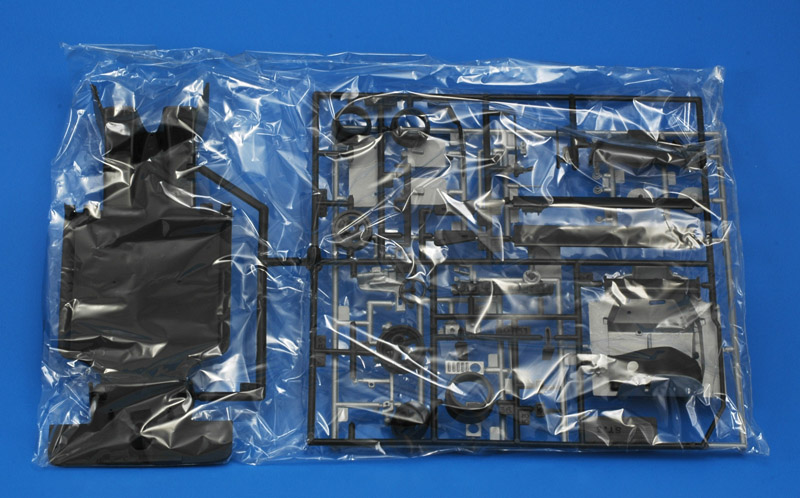
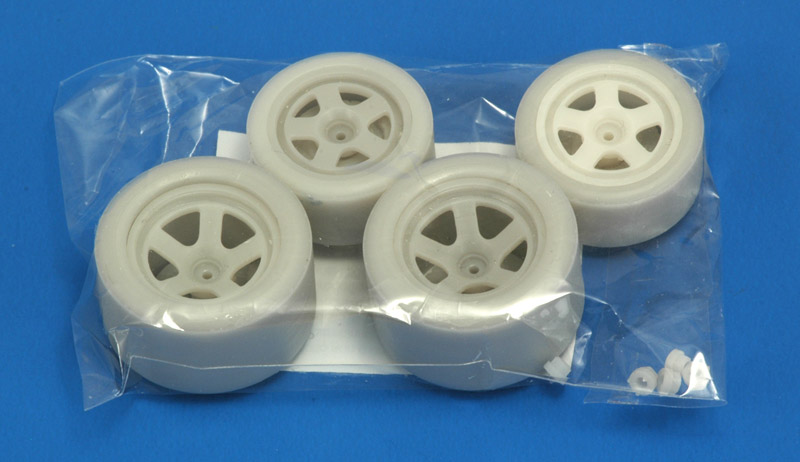
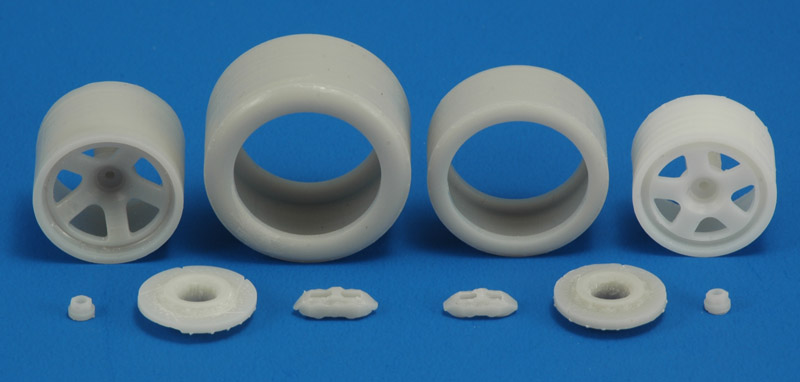
| The tires are reasonable compared to the rest of the kit. However, I can't get rid of the feeling that the front tires look far too small in the wheel opening. Plus I noted that the tires are of the 'plastic eating' variety, so be warned, they can mark other parts in the box, or will soften the wheels on a built-up model.
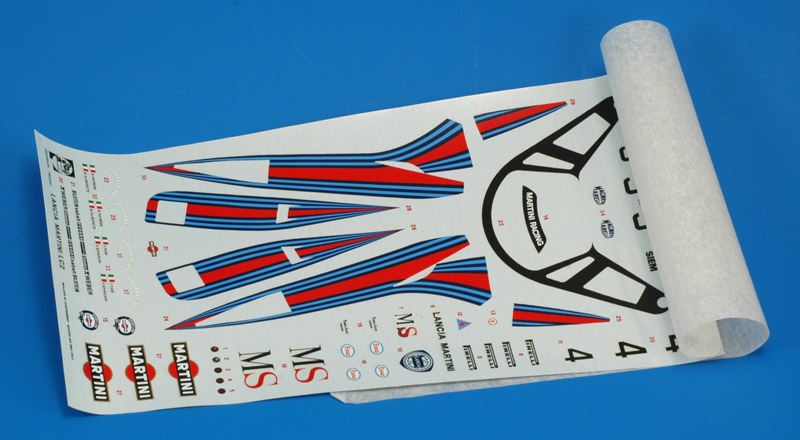
The transparancies were tinted in my original kit, but clear in this one. They have either snap-in features or require a hot metal screwdriver to melt the surrounding plastic (what?!?). The decals are by Cartograf, and look good with nice colors. But they are from the days when Cartograf still made stiff decals that will not conform to details and double-curved bodies.
|
| The decals are printed by Cartograf, but I've heard no positive accounts of them. They are stiff and difficult to apply. On the positive side, the print colors are really bright.
| 
|
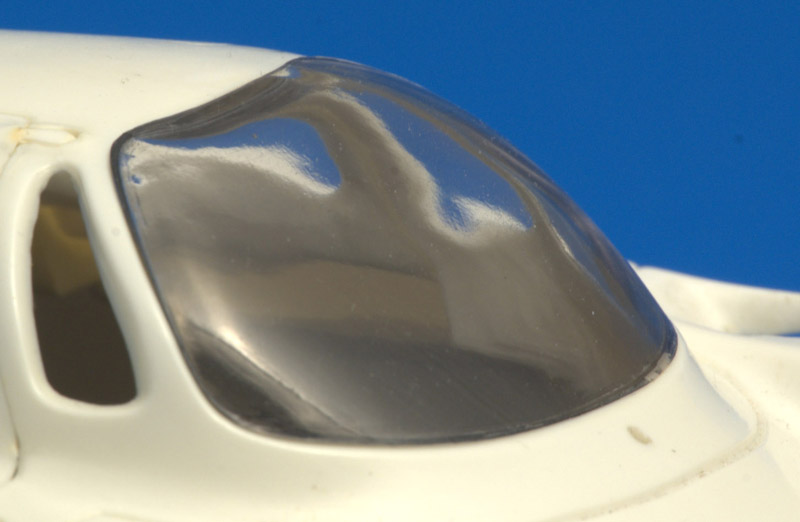
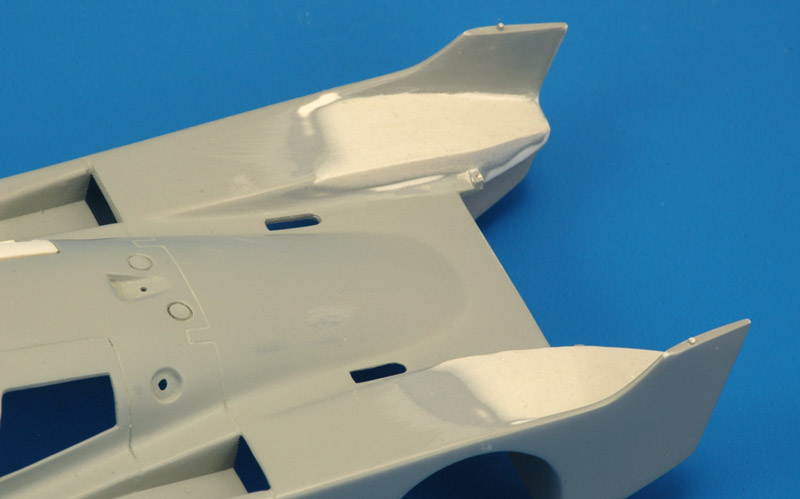
The model's main dimensions are quite OK, but it does appear to have some shape problems. The main one is the windscreen, that is far too bulbous in the top left and right corners. This creates a really weird shape when viewed from some angles. Another possible problem is the line from the cockpit roof back. In most photos this appears to be a straight line, yet the model has a curvature. The division between the cockpit section and engine cover follows an exactly vertical line in side view, but it should be slightly tilted. And conversely, the front panel line of the door is angled whereas it should be vertical. The leading edges of the fins are rather thin, whereas the real car shows rather thick rounded leading edges. The inlets in the doors have rounded edges that should be fairly sharp. As mentioned above, the front wheels look very small in the wheel openings. Either the wheels are too small or the wheel openings are too large. Together it creates a toylike appearance.
John Egbert built this LC2 model and shared the following. The biggest problem is the decals - they are stiff and brittle and wouldn't conform to curves or stick down using any combination of setting solutions. In the end John used Solvaset and a hair dryer and it went better, but not perfectly. The whole cockpit (windows and engine cover) is supposed to be covered with a one-piece decal. It is advisable to mask and spray-paint the black area instead. He used a bit of carbon fiber decal on the wings and front of the car. The rear wing end plates need to be thrown out and new ones made of plastic sheet stock, and the the wings need reshaping to thin down their edges.
All in all the model requires lot of work to make it presentable.
In 2019, Kool Models Production from Italy reported that they are working on a replacement vacform cockpit section. This would solve one of the kit's main problems. However the latest news from October 2020 is that the vacform cockpit is canceled.
Other LC2 models
There are five alternatives to the Protar model in 1/24 scale:
ARII from Japan produced a 1/24 scale LC2-85. It's a track model with an RE-280 electric motor. The body is vacformed (with some wood grain showing!), the chassis is optimised for racing and has no scale detailing. See also this Japanese page. It was also issued as a 'Lancia Italya' version. 'Garage Italya Co Ltd' was the official importer for Lancia and Maserati, and they employed chassis #001 in the 1985 All Japan Endurance Series.
Tokyo Marui from Japan (often misidentified as 'Tilt') also produced a track model with an RE-280 electric motor and a vacformed clear body. It represents the 'narrow' 1983/84 model. See also this Japanese page.
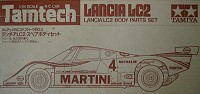
Tamiya TamTech Lancia LC2, sold as an complete 1/24 scale RC model, and as a separate spare body. The body is a one-piece clear (lightly tinted) injection moulded piece. The body represents the later, widened style from 1985 and later. One possible problem with this model that the its RC racing chassis was shared by all TamTech cars (Porsche 962, LC2, BMW GTP, Mustang Probe GTP, Testarossa, Porsche 961). Therefore all TamTech models have a 116 mm wheelbase, with 70 mm and 67 mm threads at the front and rear respectively. 116 mm in 1/24 translates to 2784 mm, but the LC2 had a wheelbase of 2665 mm (listed by most internet pages), and that makes 111 mm in 1/24 scale. These extra 5 mm are distributed roughly evenly front and rear, if I line up the Protar and Tamiya bodies with their door position on the sides. That's a bit arbitrary of course, but it's the best reference available for the center section of the car. The front wheel opening appears excessively big, but that's partly caused by the lack of a 'rear wall' of the wheel opening. Still the front edge is 3 mm further forward compared to the Protar. The whole nose section could be too long, but it's difficult to verify. The TamTech 2784 mm wheelbase was probably determined by the first model in the series, the Porsche 962 which has a 2770 mm wheelbase.
Modeler's from Japan issued a full detail resin and white metal kit in 2001. It represents the 1985 (i.e. wide-body) Le Mans car, with wide headlight covers. The main components are cast in resin, the smaller parts are executed in white metal and photo-etch, and the wheels are turned aluminium. It is a curbside model, so no engine is included. The price was 17,000 Yen, or some 140 US$. My first impression of this kit is that the body appears to be based on the Tamiya TamTech body. But luckily the nose is shorter, and the wheelbase seems to be correct at 111 mm.
Model Project from Italy issued a resin and white metal model in 2014, representing the 'narrow' early version of the LC2. Two versions are available, Martini and Totip. The body is a one-piece casting, and probably has Protar roots. The problematic Protar windscreen appears to have been corrected, but this needs confirmation. The front A-pillar is missing from the resin casting, and is created with the decals (probably a good solution). The bottom piece contains a reasonable chassis representation, unfortunately with integrally-cast seat. Wheels are cast metal, tires appear to be in rubber. The decals *could* be from Colorado, who issued Martini and Totip decals some time ago.
| 
| 
| 
| 
|
| ARII AR276
| ARII AR297 ??
| Tokyo Marui MT60-TR6
| Tamiya 2602
| Modeler's 6604
|
In 1/12 scale, you could try to build a full model from the following:
Construction
The lack of good references made things rather complicated, since the design was modified a lot over the seasons. At least three types of noses were used, and the body was widened for the 1984 season (wider rear deck only) and again in for the 1985 with a wider nose and cockpit area. Possibly the only solution is to check out magazine race reports of all seasons, and note the configuration at each race. The box photo (see top of the page) is rather confusing too, showing many strange details (missing exhaust shield, lacking slanting 'skirts'). My best guess is that this photo was taken before the car was finalised. I've put the details of the design and design changes that I found so far on this page.
Because of the limited quality of the model, I decided to build it as a curbside model. A completely detailed engine bay and cockpit would be very nice, but when I started this model I hadn't seen even a single picture of the engine bay. An open engine cover would also show how thick the body parts are.
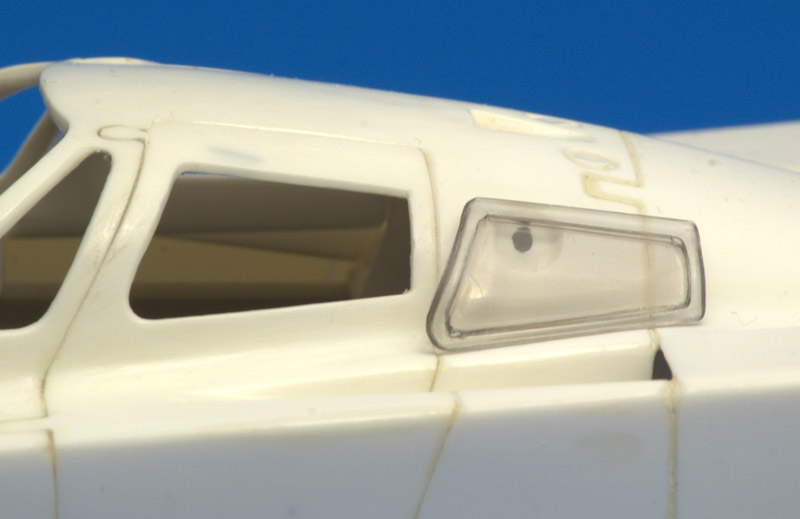
| The windscreen fits reasonably well, but then I noticed how strange the whole cockpit area looked. I think the windscreen is too bulbous, especially at the top. The first A-pillar is definitely very wrong, it curves forward instead of backwards, and this spoils the looks completely. The lower edge of the windscreen is also positioned too high. The TamTech body looks very different, and as far as I can tell by comparing it to photos, it is largely correct. The only point that I doubt somewhat about the Tamiya windscreen is that it is completely single-curved, whereas the original appears to have a slight double-curved bubble at the top on the sides. But anyway it is far better than Protar's attempt. Also of note is the cloudy transparancy of the windscreen.
| 
|
| Later I also noticed that the engine cover aft of the cockpit should be almost straight in side view, whereas the model has a continuous curve there. Question is how to solve all these problems. The 'easiest' solution is to transplant a TamTech cockpit area. Initial measurements shows that the dimensions agree pretty well between the two bodies. Alternatively, a vacforming mould could be pulled from the TamTech body. In this side view you can also see that the panel line between the cockpit section and engine cover is exactly vertical, whereas it should be slightly tilted. Had I know this from the start, I wouldn't have spent that much time refining the existing panel line.
|
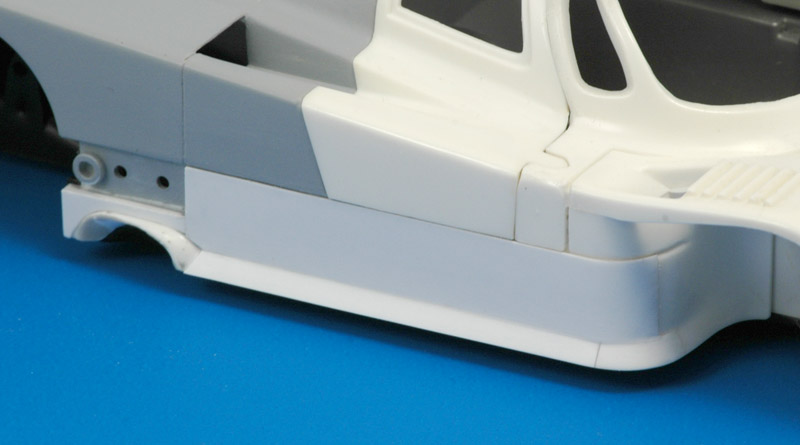
| The body sides showed a major moulding problem: the lower sides were recessed some 0.4-0.5 mm due to a mould mismatch. Shown here is the right side, which was not as bad as the left side.
| 
|
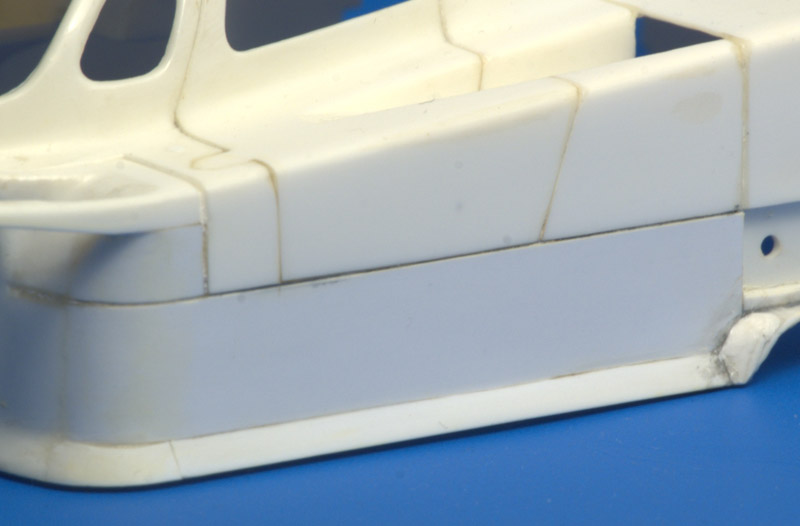
| On the left side I covered the whole area with card of a suitable thickness. The added plastic has a slightly different color. The slanting skirts were also covered in plastic card in order to retain their dimensions, as was the 'exhaust' of the air tunnel running along the sides of the underfloor, an interesting feature of the LC2 aero package.
|
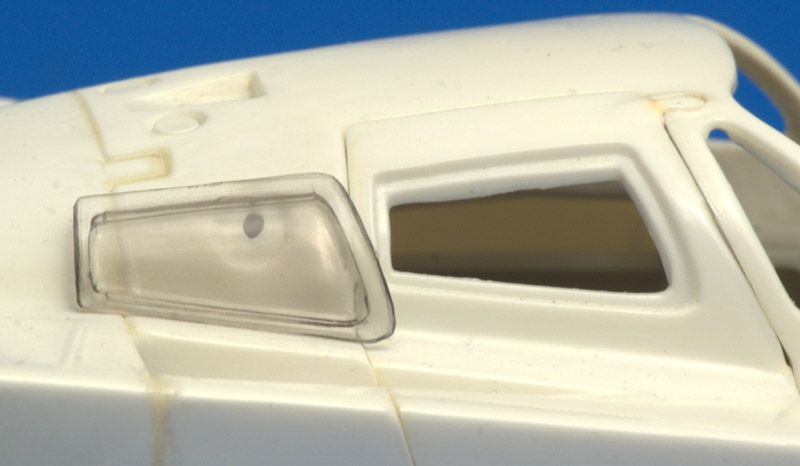
| The door window has a very unrealistic coaming in which the door window snap-fits. Theoretically that is, because the glass doesn't fit in the coaming. The instructions tell you to melt the door plastic with a hot screwdriver to lock the window part in.. sigh.. The window coaming also shows the thick plastic of the body.
| 
|
| On the left side I cut away the coaming, and thinned the body considerably. It only solves half the problem: the door window still has the corresponding step. Partly visible here is that I glued the door shut, it fits reasonably well. I then started work on the panel lines, trying to make the more subtle. The engravings were partially filled with superglue and rescribed with a knife. Most other engravings were very deep too, especially the cockpit - engine cover panel line. They were given the same treatment. The effect is difficult to judge since the superglue is partly transparent. A base of of grey paint will reveal the effect. Next question would be how to create new 'glass' for the door.
|
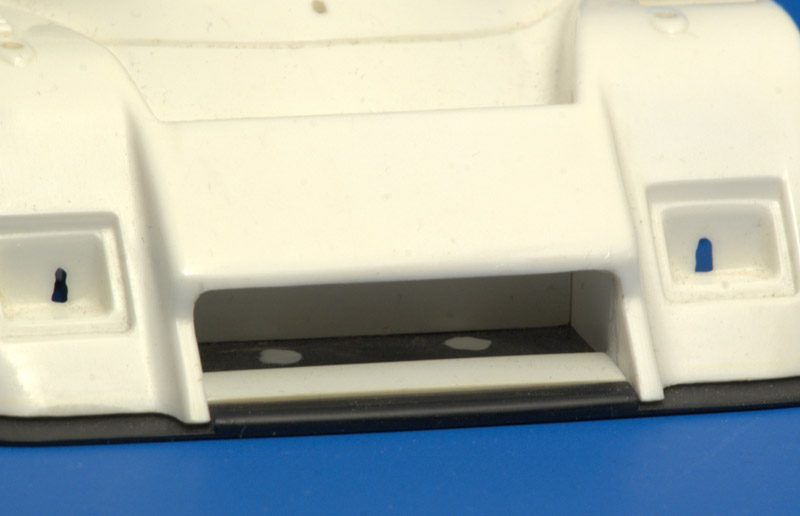
The nose needed some modifications too. The upper edge of the inlet was placed too low (see the box top photo); the opening was made taller. Another part requiring modification is the white strip just inside the inlet on the bottom side. Protar's strip is too narrow and too thick, and I replaced it with a strip of plastic card. The floor plate is very thick, and I used a belt sander to reduce the thickness at the front end.
The inlet offers a complete see-through effect down to the rear of the model. With the very limited references that I had pre-internet I concluded I had to build an open box on top of which a horizontal radiator was located. I built a box from card on the floor plate, that connected to radiator in the upper body. Still to be added is a curved floor in this box. The bump present inside the intake was located wrongly, and I cut it out, to be replaced later. The Protar radiator had a very coarse 'mesh', and I replaced it with an Ertl truck radiator. Also to be added to the radiator box are two small inlets for front brake cooling.
I also thought the inlet might be too wide, leaving too little room for the headlights, but measurements from photos seem to agree with the plastic.
| 
|
| Almost everything that I added turned out to be wrong however, and will need reconstruction. Behind the inlet/radiator box, I started building a forward extension of the chassis. Problem is that I had never seen a photo of the bare chassis. Protar moulded the forward part of the chassis (or so I thought) integrally with the upper body. Since I wanted to have a scratch-built wheel suspension, it's much easier to attach it to the floor plate than to the upper body. Therefore I cut away the monocoque sides of the upper body, and glued identically shaped plastic card pieces to the floor plate. Years later I found out that the chassis tapers a lot more, and only extends to roughly the front axle. Therefore my chassis sides are completely wrong, and will be removed. I left Protar's toy-like front wheel pivot points for the time being.
The 'radiator box' is also wrong. It should extend further aft, feeding not only the horizontal main radiator, but also two ducts behind the radiator. These ducts go under and around the windscreen and then dump their air in the lower half of the sidepods. It looks like this is the air feeding the intercooler radiators. The door inlets feed the oil coolers on the 1983 version, and the rear brakes on later cars. The two ducts for the intercooler are well visible through the windscreen, in front of the instrument panel, but you need to know what to look for.
Another thing I found out years later is that the flat floor plate is probably not correct. The wider later-model LC2 have a 'cavity' under the front axle, much like the 'Delle' of the Porsche 956 Kurzheck. I'm not 100% sure that the narrow LC2 had it too.
|
| Moving back to the body, I installed the rear fender inserts and used a lot superglue to fill all the gaps. On the exterior side there was plastic shrinkage visible (see lower right corner of the photo), that was also filled with superglue, but not sanded yet. The right wheel opening (at the bottom) again shows the massive thickness of the body. The left wheel opening was scrapped much thinner.
| 
|
| Then I partially painted the model in a neutral grey to see how the work had progressed. The work on the panel lines had paid off, just see the difference between the panel line of the nose section and that of the door. Biggest problem still remains the cockpit section with its shape problem and bad windows.
I also have my doubts about the rather sharp kink of the bodywork over the rear wheels. I see a larger radius in photos of the real car, so this area will require filling. Most photos show slot-shaped exhausts before the apex of the 'fenders', it seems these were added after a few races. Another shape problem is that the rear end of the 'cockpit bulge' on the engine cover is too wide. There should be a bit more room for the brake ducts.
|
| I found an excellent photo of the cars at the 1983 Silverstone race, with the tails up, and this showed clearly that there was no kink in the top of the fender. Possibly the Turin 'presemtation car', that Lancia used as their reference, had these concave areas? I built up the areas with Apoxie. It's still a bit rough, a coat of paint will tell how much work it still needs.
| 
|
| On the right side, the lower body was recessed 0.3 mm, and I used 0.3 mm plastic card to fill it in. You can probably distinguish the slightly different color of white. It wasn't too much work.
|
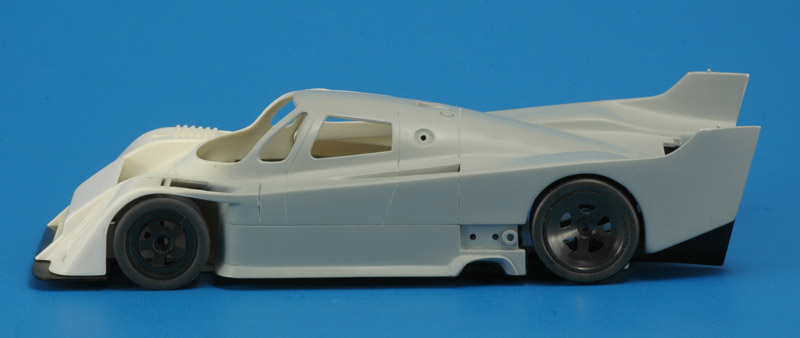
| I made an overview of the work on the body so far. I haven't done much on the front side, therefore I haven't painted that part in base-coat yet. The kit's biggest problem, the windscreen shape, has not been solved yet.
| 
|
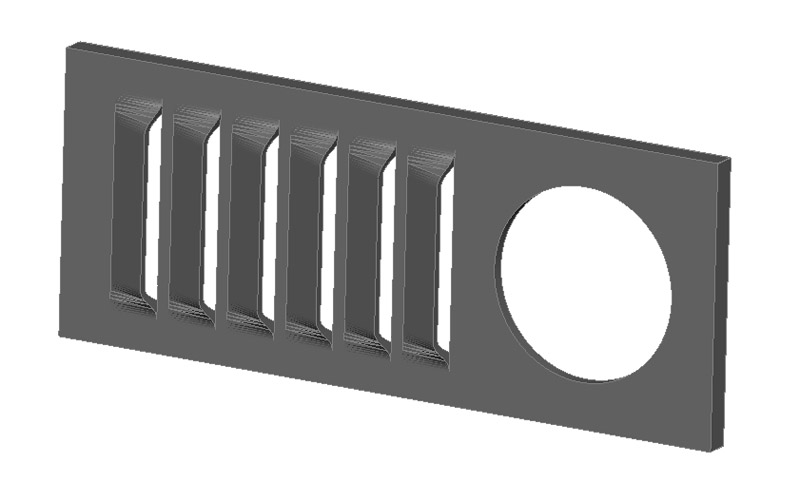
| There was one more big obstacle: the louvers over the front wheels and around the exhaust. The kit's louvers are very, very simple. I put the design and print process on a separate page (3D printed parts for the Protar 1/24 Lancia LC2), showing only the status here.
|
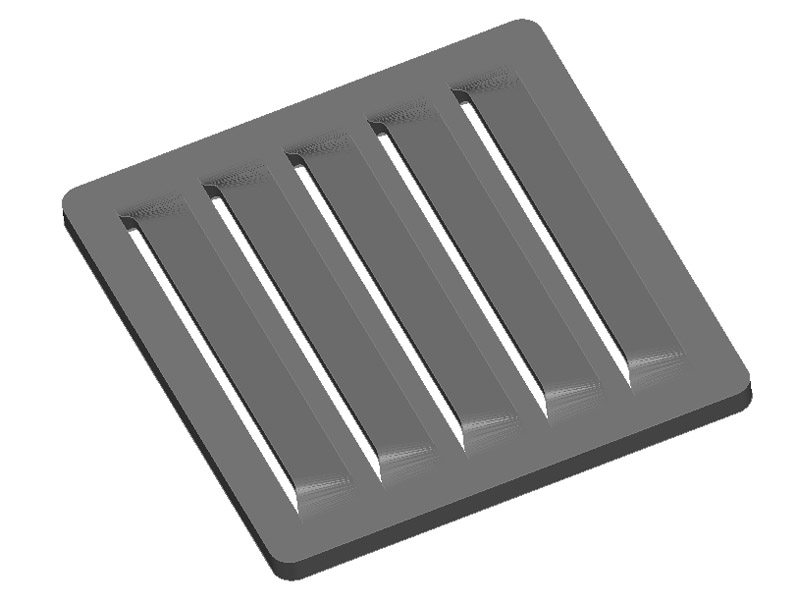
| The front fender louvers were designed the same way, reusing the former part's file with different dimensions.
| 
|
| For reference, a photo of the Tamiya Tamtech body. My plan has always been to pull a mould of the cabin section, and vacform a copy for use on the Protar body.
I used the rear wing for an experiment, to find an acrylic paint that could be easily stripped off again. I need to paint the body for 3D scanning by a friend. I'm not experienced with acrylic paint, therefore I experimented a bit with paint stripping. I painted the wing with Vallejo, and let it cure for several days. First I tried NaOH, then ammonia, then ethanol, all in my ultrasonic cleaner, and only the last had effect. But it also damaged the part considerably, turning it milky white.
|
Engine bay
I'm not planning to open up the engine cover to show the Ferrari engine. However, some comments on this task. Murray Dickinson reported that LC-2's Ferrari engine and gearbox were used in the 1984/1985 Ferrari 288 GTO. The Italeri 1/24 kit of the GTO (kit number 652) has a very nice engine/gearbox with strengthening ribs, turbos etc (Tamiya quality). You can see for yourself in Alan R's build report on Britmodeller. Alternatively the Fujimi model, kit number 8105 (Enthusiast Series) could be a source. It seems either would give a good basis to work from.
Fellow modeller Eric Verschuur reported more on the engine.
According to one of his sources (a Haynes book), this engine started life as the Typo 105 V8 block as used in the Ferrari 308, which was converted by Abarth into a race engine for the LC2, and a modified version of this engine was then installed in the Ferrari 288 GTO. A quick comparison of some available photos show similarities and some large differences between the LC2 and GTO engines. One of the most striking are the inlet ducts. On the LC2, each cilinder bank is fed with air from the opposite turbo, with a small air box overhead the opposite cilinder head. On the 288 GTO, each cilinder bank is fed by air from the turbo on its own side, and the air boxes are rather different. Whether the LC2's gearbox was retained is unclear. Concerning the models, Eric commented that the Italeri model has the Ferrari F40 engine, which is incorrect. The Fujimi kit (EM22, later 8105) however has a correct and fully detailed engine. This model was reissued by Testors in the USA.
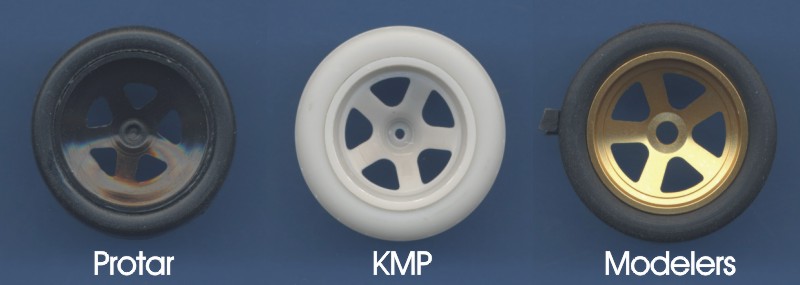
KMP wheels and tires
Kool Models Production from Italy released a wheel and tyre set in 2018, catalog number KMP-TK24001. Here's the package that I received.
I learned later that these wheels are meant for a 1985 version of the LC2. I nevertheless checked below whether these wheels and tires are suited for the 1983 LC2 too. KMP is planning to do the 1983 wheels in the future for a full detail set.
| 
|
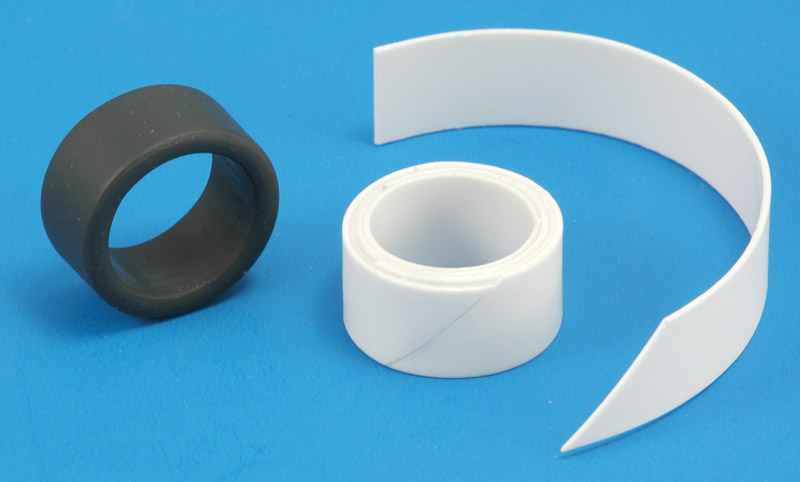
| The KMP's site did not mention that the wheels and tires are separate parts, and neither about the brake discs and wheel nuts - a nice surprise! The parts are 3D printed, and very nicely detailed, with very small printing steps. 3D printed parts require supports during printing, therefore the rear sides of most parts require considerable clean-up. The brake disc suffer worst, only one side is usable. I sanded the tires with 1000 grit sandpaper to eliminate the printing steps.
|
Front wheels and tires
It took me an awful long time to figure out the wheels and tires. I'll start with the front ones.
The kit's front wheels/tires looked way too small to me, when positioned inside the wheel well. The skinny tires make the model looks silly, and I suspected the wheels were too small too. I also noted that the tires are of the plastic-eating type, so they are useless anyway since they will soften and eventually deform the wheels. I looked for replacements in other kits but found none. For example, the Tamiya 956 front tires fit well, but the side walls are too tall, or the tire diameter is too large.
The wheels were Speedlines, possibly identical to those of the Lancia Beta? 'The directory of world sportcars - Group-C and IMSA - Cars from 1982' reports on page 106:
'With rim widths restricted to 16-in, Lancia went to 15-in diameter Speedline wheels at the front, and 19-in diameter at the rear. Pirelli provided F1-developed tyres, but it was realized immediately that the specification wasn't good enough for the heavier, higher downforce sportscar.'
Page 107 adds:
If indeed Porsche 935 tyres were used, then possible sizes are (see 935-77 data):
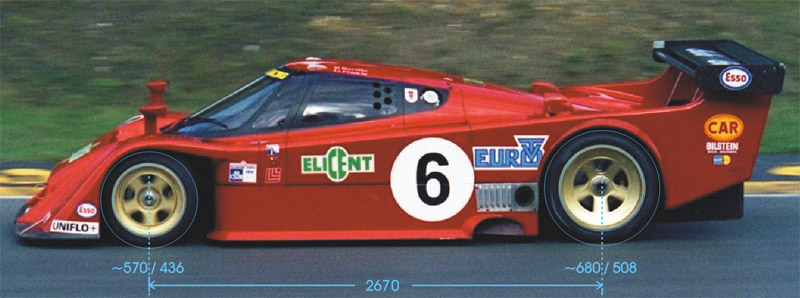
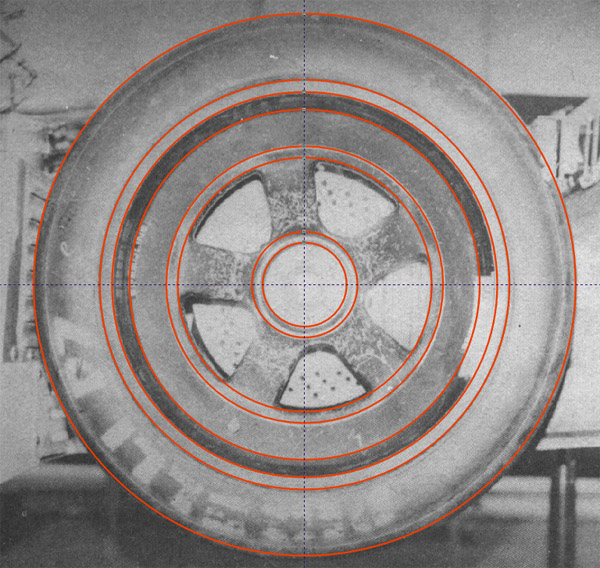
| The answers finally appeared when I did a photo analysis. Using a good side view of the Mirabella car (1983 Brands Hatch), and knowing the wheel base of 2670 mm, I could measure the wheel diameters accurately, and the tire diameters reasonably accurately. The numbers are shown in the picture. Equally important I found out that the tire retaining lip was way smaller than the 0.8" figure that I use as a standard: it was around 0.45". This had mislead me continuously before. This clearly showed that the front wheels were 16" diameter and not 15" as usually reported! One source of constant confusion was eliminated.
| 
|
Next I measured all front wheels and tires:
|
|
| Protar
|
| KMP
|
| Modelers
|
| My photo measurements
|
|
|
| mm scale
| mm 1:1
| inch 1:1
| inch - 1.6
|
| mm scale
| mm 1:1
| inch 1:1
| inch - 1.6
|
| mm scale
| mm 1:1
| inch 1:1
| inch - 1.6
|
| mm 1:1
|
| Front wheel diameter
|
| 18.1-18.2
| 434-437
| 17.1
| 15.5
|
| 19.1-19.2
| 458-461
| 18.1
| 16.5
|
| 18.5
| 444
| 17.6
| 16.0
|
| 436
|
| Front wheel width
|
| 11.4
| 274
| 10.8
| n/a
|
| 11.4
| 274
| 10.8
| n/a
|
| 11.0
| 264
| 10.4
| n/a
|
|
|
| Front tire diameter
|
| 23.0
| 552
| 21.7
| n/a
|
| 24.7
| 593
| 23.3
| n/a
|
| 24.0
| 576
| 22.7
| n/a
|
| Pirelli ~553
Dunlop ~570
|
| Front tire width over sidewalls
|
| 11.8-11.9
| 283-286
| 11.2
| n/a
|
| 12.0
| 305
| 12.0
| n/a
|
| 11.8
| 283
| 11.1
| n/a
|
|
|
|
Surprisingly, my photo analysis showed that the Protar front wheel was correct after all, at least for the car I wanted to portray. And the tire was correct too, for the Pirelli era, but not for the Dunlop era.

| Knowing the wheel diameter accurately allowed me to scale the excellent front wheel photo from the instruction sheet, and measure all other dimensions of the wheel. When compared to the Protar front wheel, they matched nicely.
|
I tried to find a Dunlop-sized tire in other kits, but alas. I decided to scratch-build one from laminated plastic card. I used my measurement for the Dunlop tire (from the Mirabella car) that had a 2.8 mm side wall. And it was not too difficult: I laminated four layers of 0.75 mm plastic card tightly around the wheel. The first one (left) was built with strips that butted with 90 degree cuts, but that method resulted in small kinks in the tire. The next one (right) was built with 45 degree cuts, and that worked a lot better.
I made the tire's width a bit oversize, then cut the tire to the correct width using a JLC razor saw. I assumed 275 mm was the correct figure (using the Porsche 935 numbers), plus they matched the Protar tire width. I still need to cut the rough side of the 'white' tire to size. My scratch-built tire was 24.3 mm diameter which corresponds with the slightly larger Dunlop tire. Maybe I'll do a smaller Pirelli tire later.
I tried the same technique later on another model. I found out that starting with 0.5 mm card instead of 0.75 mm makes life a lot easier, specifically when you start wrapping the wheel with strips of plastic card. Later you can switch to thicker card.
| 
|
| The proof of the pudding was to fit the wheel in the wheel opening. And I think it looks good! A very long chapter of this project can finally be closed: the front wheel problem is solved.
|
| I wanted to see whether I could easily duplicate these home-built tires. I made a mould of the front tire, with the tire slid over a 1 mm tube of plastic card. I cast two copies, and freed one of its moulding stump. One had air bubbles on one side. This can be explained, bubbles get stuck in the bulged side-wall and cannot escape. I have to think about a solution for that. Or I accept the shortcoming, and fill the few air bubbles on the backside of the tire.
| 
|
Rear wheels and tires
The same measurements for the rear wheels.
|
|
| Protar
|
| KMP
|
| Modelers
|
| My photo measurements
|
|
|
| mm scale
| mm 1:1
| inch 1:1
| inch - 1.6
|
| mm scale
| mm 1:1
| inch 1:1
| inch - 1.6
|
| mm scale
| mm 1:1
| inch 1:1
| inch - 1.6
|
| mm 1:1
|
| Rear wheel diameter
|
| 21.2
| 509
| 20.0
| 18.4
|
| 20.2
| 485
| 19.1
| 17.5
|
| 21.5
| 516
| 20.3
| 18.7
|
| 508
|
| Rear wheel width
|
| 15.4
| 370
| 14.6
| n/a
|
| 15.5
| 372
| 14.6
| n/a
|
| 15.0
| 360
| 14.2
| n/a
|
|
|
| Rear tire diameter
|
| 28.0
| 672
| 26.5
| n/a
|
| 28.2
| 677
| 26.6
| n/a
|
| 29.2
| 701
| 27.6
| n/a
|
| Pirelli ~673
Dunlop ~680
|
| Rear tire width over sidewalls
|
| 15.6
| 374
| 14.7
| n/a
|
| 16.9
| 406
| 16.0
| n/a
|
| 15.4
| 370
| 14.6
| n/a
|
|
|
|
Again, and again surprisingly, the Protar wheel and tire are closest to my photo measurements of the 1983 car, and the Pirelli tire size calculated below.
The excellent rear wheel photo from the instruction sheet could now be scaled accurately, leading to a tire diameter measurement of 673 mm. The Protar wheel details can be checked too, and most dimensions are fine. However the step in the wheel around the spokes is absent. The KMP and Modelers wheels have far larger spokes, and are no improvement at all.
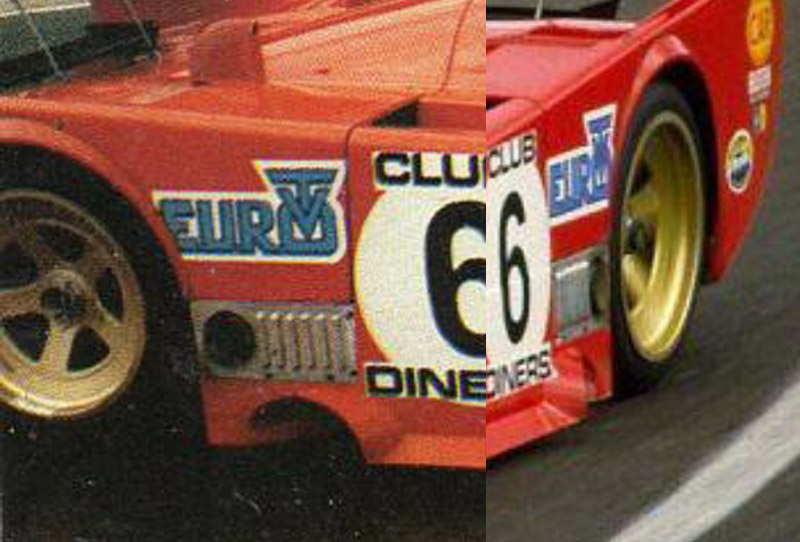
The photo analysis does not provide 'depth' measurements, and the wheel could be off too in that respect. For example the spokes could be 'flat' whereas the Protar spokes are 'dished'. I still need to analyse this further. This Spa 1983 photo is probably the best available, and indeed it shows a rather different 'depth' shape - the are 'flatter'. The box art photo also gives a reasonable view of the wheels. I think a lathe is required to cut news parts.
| 
|
| These two (partial) photos are the best I could find to show the shape of the wheel. I see a dished spoke area, with its exterior edge slightly raised, and a flat (or maybe very slightly dished) disc between the spokes and the tire retaining lip. Next problem is how to convert the Protar wheel to this shape. With a lathe it would be easy, but I don't have one.
|
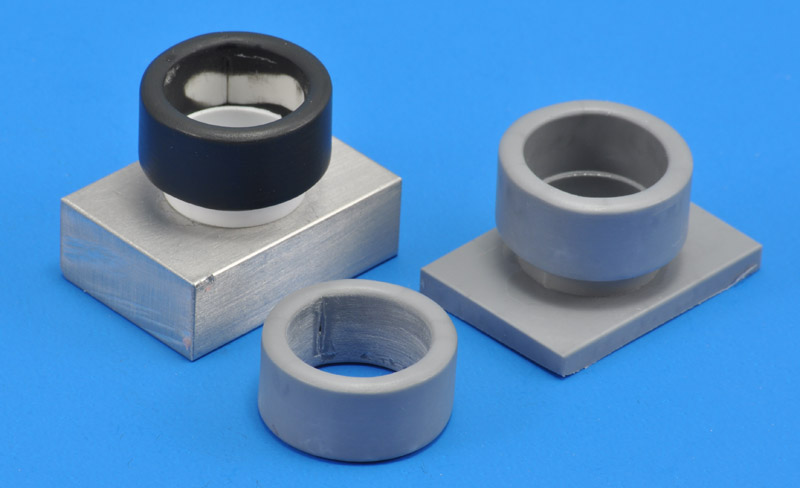
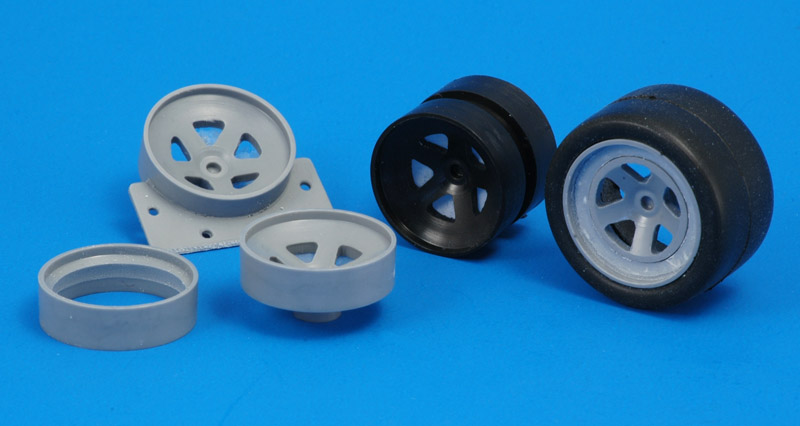
| To make a rough prototype of what I now think the rear wheel should look like, I made resin copies of the Protar wheel (black). I used one casting to cut out the 'heart' with the spokes and a ring of 1 mm around it; the ring was subsequentlty sanded flat. On another casting I filled the cone-shaped part with Apoxie to make a much flater cone. The way Protar made it, the dish was ~4 mm deep, and I made it ~1.5 mm. Next I cut out the center, 15 mm diameter. I then assembled these two parts, with the center part protruding 0.2-0.3 mm from the cone-shaped dish. On the right you can see what I think the 1983 LC2 rear wheel looked like. I now need to find a lathe to make a better version of the outer part.
| 
|
Decals
As mentioned above, the kit decals are reportedly very difficult to use, and this is especially problematic with the complex Martini scheme used on this car. There are alternatives however:
The decal sheet for the Tamiya TamTech bodies used to be sold separately, in both the Martini works team and 'Sponsor Geest Team' versions. Two problems: even on the backing paper they appear to be partly translucent, and they are designed for the much changed LC2-85 body shape. Chances are small they fit the Protar kit.
In 2003, Carpena / Colorado issued decals for the 1983 'Presentation Car'. I am not sure which car this is (roll-out?), but having a high-quality set of Martini decals solves the biggest problem at least. Racing numbers are absent since the roll-out car did not have them. Sheet number is 2483, and since the Protar kit is the only kit with the required body, I would expect them to fit the kit well.
The above decal sheet appears to have been copied by Trackside decals / Jim Heller, who sells them on Ebay, and has a long history of selling copied and inkjet-printed decals.
Carpena / Colorado also issued a set for the 'Totip' sponsored Jolly Club car of the 1984 Monza 1000 km race. This scheme was reportedly also used for a few other races in Italy. Sheet number is 2484. A photo from this race can be found on the fantastic Racing Sports Cars site.
Patto's Place Decals from Australia does an Alps-printed repro of the Protar sheet
Gooche Decals used to sells the original Protar decals under their name, but has closed up shop a few times, last in 2016
Decal Doc from Germany used to sell Alps-printed Martini and Totip decals in 1/18, 1/24, 1/32, 1/43 and 1/87 scales
Kool Models Production from Italy, catalog number KMP24022 from 2018, produced on demand
LC2 modeling links
LC2 links
References
Apart from racing magazines covering all races (such as 'Grand Prix magazine'), I found the following books with LC2 information:
'Lancia Racing' by Nigel Trow, 1987, 288 pages, Motorbooks
'Directory of World Sportscars Group-C and IMSA cars' by Mike Cotton, 1982, 216 pages, Motorbooks
'Lancia da Competizione' by G. Reggiani (ISBN 88-7911-199-X and 88-7911-204-X), Italian language, with 16 pages on the LC2, mostly photos, some text
'Lancia Corse' by Alfio Manganaro and Paolo Vinai, published by Automobilia (ISBN 88-85058-98-1), 336 pages, 1988. It describes the history of Lancia racing in Italian/English/French, with lots of text about the LC2, discussing modifications made for certain races
'Lancia - La filosofia della sovralimentazoine', a factory-published book distributed to members of the factory HF club in the early 1980s (Italian text), with some LC2 information.
The UK magazine 'Motorsport' had a track test in its April 1998 issue ('The Lotus story' on the cover).
There are also a few modeling references on the LC2:
A yet to be determined issue of 'Auto Passion', a French car modeling magazine, had a nice four page article on modifying the Protar kit to two 1983, one 1984 and one 1985 cars. The article includes model photos and sketches (copies were most kindly sent by Julian Herrero)
'Scale Models International' April 1984 issue has a 3 page article by Roger Taylor including drawings, covering the first (1983) season. It does not review the Protar model, possibly because it hadn't been issued yet back then.
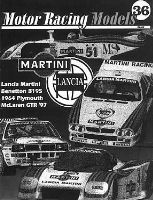
Motor Racing Models issue 36 contains a special on Martini sponsored Lancias, including the LC2. The 1 1/3 page article deals with both the Protar and Tamiya kits, with almost no comments on the actual build process. Not very useful.
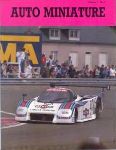
I haven't seen it in the flesh, but the first and only issue of 'Auto Miniature' (published by Kimberly's in the UK) had an article on the Lancia LC2 (it was also the cover car)
The October/November 1993 issue by Tamiya Magazine has an article about the Protar LC2. It's only one page, and only half the text deals with the model that was built straight from the box. Not very useful.
The Grand Prix Modelers Association website contains an article about Anthony Calderisi's metal Protar LC2
Configuration change study
Through the LC2 chassis list on the Racing Sports Cars site, it is possible to analyse the configuration changes.
| Track and date
| Nose
| Rear wing
| Engine cover
| Other details
|
| Monza 10 April 1983
|
|
|
|
|
| Silverstone 8 May 1983
| 'Protar' nose
| Looks like triple element wing. 'Pirelli' on inner side of vertical tail
|
|
|
| Nurburgring 29 May 1983
|
|
|
|
|
| Le Mans 16 June 1983
| New nose with large bulbeous headlights
|
|
|
|
| Nürnberg / Norisring 3 July 1983
| 'Protar' nose
|
| Probably no oil cooler exhausts yet
|
|
| Spa 4 September 1983
| 'Protar' nose
| triple element
| Oil cooler exhausts ahead of rear wheels. Seen with and without rear brake intakes! Note missing decals on apparently new bodywork
|
|
| Brands Hatch 18 September 1983
| Protar nose
| Looks like two element wing
| Oil cooler exhausts ahead of rear wheels
|
|
| Fuji 2 October 1983
|
|
|
|
|
| Imola 16 October 1983
|
| Two element wing
| Oil cooler exhausts ahead of rear wheels
|
|
| Mugello 23 October 1983
|
|
|
|
|
| Kyalami 10 December 1983
|
|
|
|
|
Change of plans?
The LC2 continued to be raced until 1991, in various sponsor markings (see the Racing Sports Cars site again). The 1991 markings for example are pretty basic, on an overall Ferrari red car, which is quite nice. I will probably finish my Tamiya TamTech body in this scheme, most likely that of the Nurburgring 1991 race, of which I found four photos. You can see it retire here: 1991 SWC Rd.5 Nurburgring.
Shown below is the decal set I drew up; the items are not scaled yet though. The Russian logo site yielded vector artwork for Lancia, Ferrari and Veneto, although I had to modify the Ferrari logo somewhat to make it look like the logo seen on the actual car. The remaining logos were created from several fonts, with modifications. Parpas Group appears to be some kind of industrial group, Mionetto is a wine brand, Delfin no longer seems to exist but was in finance, Veneto and Equipe are somehow linked I believe (there is a Equipe Veneto site). The team was listed as 'Veneto equipe' however (i.e. backwards). The 'Vallelunga circuito' decal was probably the toughest, since my photos of it were quite blurred. The 'Vallelunga' part is pretty accurate now, but I had to guess the font used for the 'circuito' part. I received an e-mail from Italy (hi Riccardo!) that pointed out a spelling error in my original Delfin decal artwork, that is now corrected.

Return to models page