Revell 1/72 F-16A (#1)


I guess that Revell's H222 box from 1976 is instantly recognised by all modelers born before 1970 - it was *the* kit in 1976-1977. The box art was unusual and striking, and showed that the kit had tons of extras in terms of stores and ground equipment. For our club's fictitious shop displays project for the 2023 ESM, I decided to build this old model to look as much as possible like the model on the box. I'm therefore not building it straight out of the box per se.


Model quality and accuracy

The accuracy of this very early F-16 model is not perfect, as could be expected. It's mostly a Full-Scale Development (FSD) F-16A with some YF-16 details. The decals are YF-16-ish, as is the Escapac ejection seat. The front fuselage plus radome is mostly like the FSD F-16A.

Surprisingly for the vintage, the kit has engraved panel lines. They have something strange: the plastic around most panel lines is slightly raised, it stands proud just a tiny bit. It's almost like the master model was built from dozens and dozens of blocks stuck together, with each block having raised edges. I have never seen this in another model, and I'm quite curious how this happened.

Many parts require a lot of preparation: removing flash, ejector pins and sanding the edges straight. As an example assembling the three wheels took me about an hour. But I guess this was state of the art in the mid-seventies, so you really can't complain to much. Also, Revell produced millions of this kit, so the mold probably wore out a bit.

The kit decal sheet has the wrong serial number for YF-16 #1 (72-1567 became 07515 on the decal sheet) and a more or less correct serial number for #2 (72-1568 became 07-568 on the decal sheet).


Construction

The lower wing had substantial anhedral, the upper wing was the opposite. Clamped together there still was a bit of dihedral, so I bent the wing roots of the upper fuselage a bit down, hopefully giving zero dihedral after gluing. The lower wing insert needed some shimming for a good fit inside the upper wing. I used 0.1 mm plastic card all around, and additional 0.05 mm card in two locations. Since I wanted to build the red-white-blue version with just tip Sidewinders, I filled the pylon holes in the lower wing.
I changed the installation of the cockpit tub to the upper fuselage instead of the lower fuselage. The tub, once installed, has gaps all around. To avoid see-through effects I added small sections of plastic strip. The tub, seat and upper fuselage were painted Humbrol 126 as an approximation of FS 36231. The cockpit decals were prepared by cutting them in pieces and to size, before attaching them with lots of Future. A coat of satin clear (Humbrol 135) finished the work on the cockpit tub, but it also resulted in a grainy surface. The photo shows that the 'black' cockpit decals are halfway between insignia blue and black.

The strange color of the cockpit decals become more visible when I installed the cockpit tub in the upper fuselage, that I painted part Humbrol 126 (mostly inside) and Revell 9 anthracite (top side). But there was little I could do, except maybe repaint the anthracite part.
The radome did not fit nicely to the fuselage, appearing to be slightly larger than the fuselage. I solved that by cutting an 0.3 mm slice from the radome part, using an 0.1 mm JLC razer saw raised 0.2 mm by two sheets of printer paper. After I glued it the fuselage, the height was too large, and had to sand quite a bit to arrive at smooth contours.
The two-part canopy shows a nasty fit between main and rear parts, leaving gaps on either side.
With the cockpit installed, I could close the fuselage. But first I had to scrape the lower fuselage aggressively to make the fuselage close around the cockpit tub. I still don't understand where the fit problem really was, but in the end it fitted. The horizontals were added with an anhedral of 10 degrees. The radome followed next, but despite the length reduction, it still would not fit nicely. A sanding stick helped sorting it out, but you can still see a kink on the lower side. The strange raised plastic around the panel lines all over the fuselage was eliminated with a sanding stick. It made the model a lot nicer, but it also felt a bit like cheating for a straight from the box build.
The seat was painted in the slightly strange colors that Revell's instructions tell you to use. I used strips of decal to create simple seat belts. The seat was then installed, followed by the canopy. I used epoxy glue for the latter.
It starts to look like an F-16 now! The glue joints were now sanded smooth, sanded-down panel lines were rescribed where needed, scratches filled in with paint, all the usual techniques to create a nearly flaw free model.
The execution of the extreme end of the radome and pitot tube made it nearly impossible to build it like the box without either gaps or breaking off the pitot tube during painting. I made a metal copy of the kit's pitot tube from a steel pin, and installed a matching 1.4 mm Albion tube in the nose, from their fantastic 'Sliding Tube' collection. The pitot sticks out 8 mm. Only later I noted that the prototype model on the box has a rather different pitot tube, but I decided to stay with this one.


Painting

The white plastic makes judging the build quality really difficult. With some regret I painted the whole model light gray, Humbrol 127, my standard base-coating paint. Of course I masked the canopy first, using Tamiya tape. Now I could see the faults a lot better. These were subsequently dealt with one by one - you can see the various areas that required attention. A second layer of gray paint was then applied.
I painted the model with Tamiya X-2 White, mixed 1:1 with X-22 Gloss, and then mixed 1:1 with Tamiya Lacquer Thinner. This paint system was completely new territory to me. I managed to obtain a really nice shine by MicroMesh sanding with 3600 or 4000, the polishing with Novus #2. However I also left fingerprints on the opposing surfaces while providing counterpressure. And this was two months after painting!
I gave up at this point, and removed the Tamiya paint with denatured alcohol. Unfortunately I broke off a tip launcher in that process. I found the new look of grey with white panel lines quite charming :-)
I repainted the model with Zero Paints ZP-1026 'Pure Brilliant White'. This is a matt base coat, and will be followed by an Alclad clear coat. The tip launcher had been repaired with a 0.5 mm spring steel wire inside to provide strength - so far it has held well.
I decided to try something new to mask the blue areas on the spine and belly: custom-cut vinyl masks, that IPMS club member Benno could cut on his Silhouette cutting machine. Design work started with the painting instructions in the manual, on top if which I designed a mask. It took several attempts to arrive at something that would fit properly on the model, and that had the right curves. Only on the later versions I added slits ahead anf aft of the canopy, and that helped a lot.

Note that these marking are different from both the real YF-16 and FSD F-16 versions - I mostly tried to copy the Revell box top model's shape. On the YF-16 the blue areas have straight borders, on the FSD F-16 they are curved.
Quite a few paper versions were test-fitted to fine-tune the shape. With paper you cannot imitate the flexibility of vinyl, so it's never a perfect fit. The mask you see on the model is the inverse of what I need for masking, but I first want to apply this mask to the model to ensure symmetry and shape. The center mask is then bordered with the actual painting masks, and the center mask removed. Also, the refuelling markings are not part of the mask of course, I left them on for fun.
Here's the topside vinyl mask applied. I used it to align the 'outside' (negative) masks accurately.
Here's the lower side mask applied.
I used the reverse mask, butting it against the original mask, and use kitchen foil to cover the remainder of the model.
I have a limited collection of MRP paints, so I mixed MRP-045 Ukraine Su-27 Dark Blue and MRP-183 Oxford Blue one-to-one. Pure MRP-005 Black was used for the forward section, with a soft edge to the blue.
After removing the masking, I was impressed by the overall look. But a disappointment awaited: I had masked the canopy wrong, covering the whole thing. And even worse, the cockpit interior contained many plastic shavings, jammed between the interior and canopy, not to be moved.. No idea where the debris came from!
I broke off the canopy, cleaned, reglued, and filled the gaps with Apoxie Sculpt. I hope I can repair the paint job.
The red wings were masked freehand with 2 mm Tamiya tape, followed by 6 mm Tamiya tape, finished with large pieces of paper to cover the rest of the model (not shown here). I used MRP-299 Insignia Red. I painted the wings one by one because the paper masking was disrupted easily.
The blue area on the lower side was done with a Silhouette-cut mask, plus enormous amounts of Tamiya tape to mask the wheel wells. The doors were done separately.
The red area on the vertical tail was the last paint job. I left a gap of 9 mm for the decal there. All in all the color scheme was a ton of work! But it does look sweet.


Decals

The 1976-vintage decals looked like they would be difficult to apply, and the yellowed decal film would be very visible. Plus, I really did not like the black-blue ink used for both black and dark blue decals. I've since learned that not all H-222 decals were created equal. Those printed by Revell-UK do have separate inks for the black and dark blue decals. Mine are printed by Revell-Germany.

Since this wasn't a 'straight out of the box' build but a 'just like the box art' build, I saw no problem to replace the decals. Therefore I redraw all of them in CorelDraw, for subsequent decal printing. I planned to use aftermarket decals for the national insignia, until I noted that the Revell decals were a non-standard size. Regular ones are in multiples of 5 inches of the star diameter.
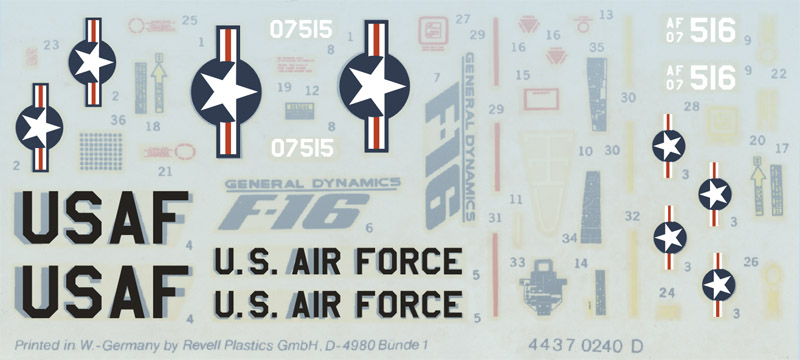
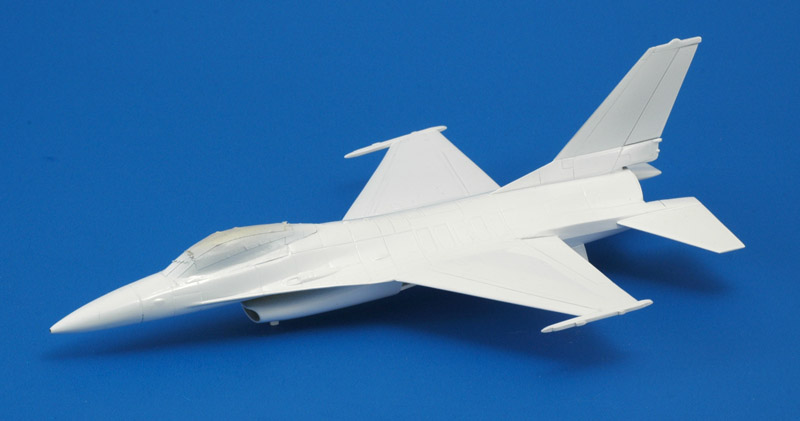
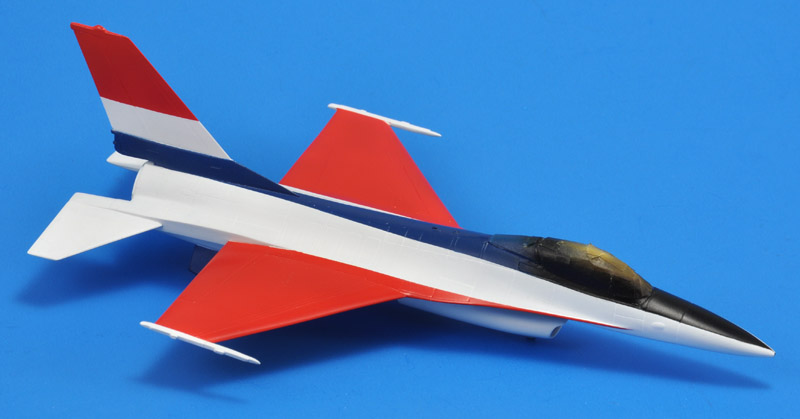
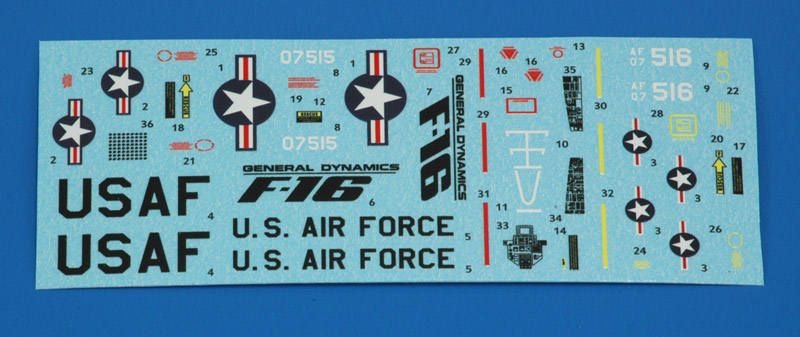
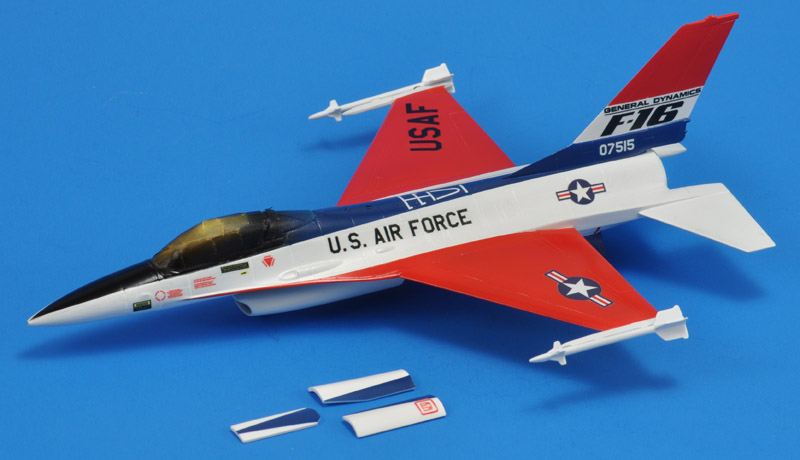
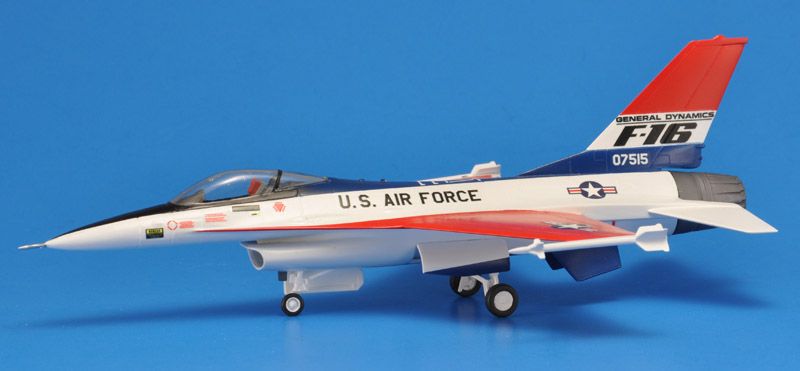
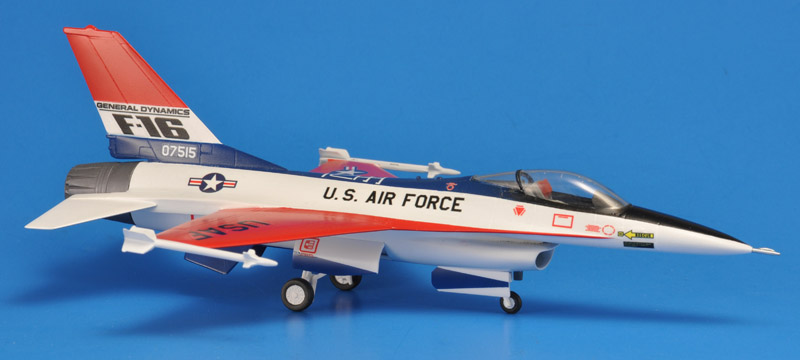
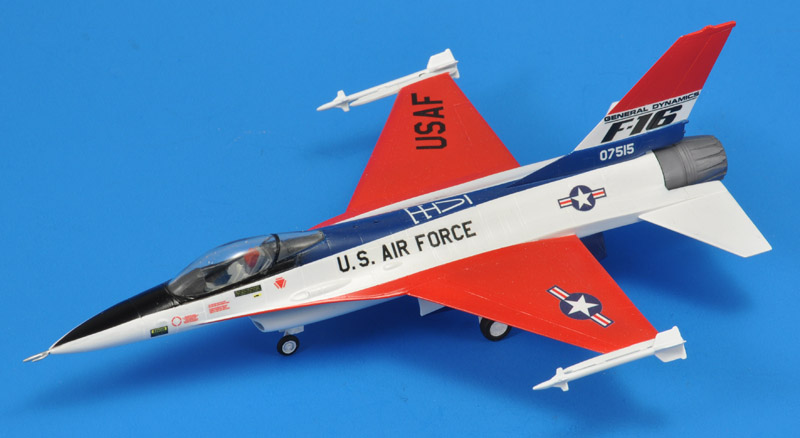
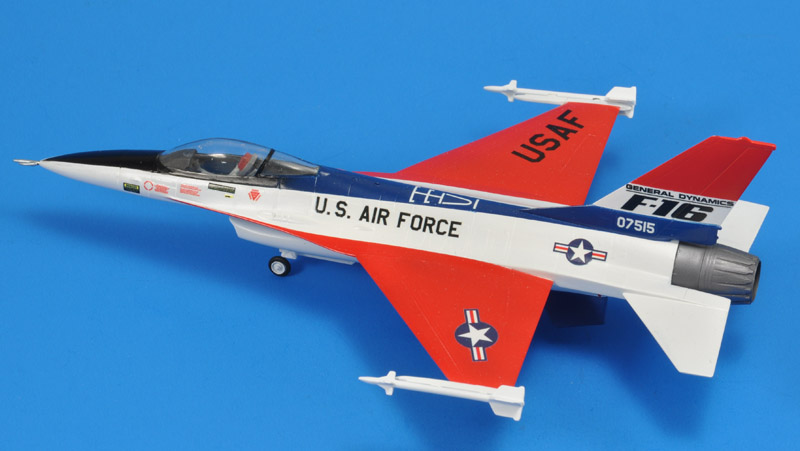
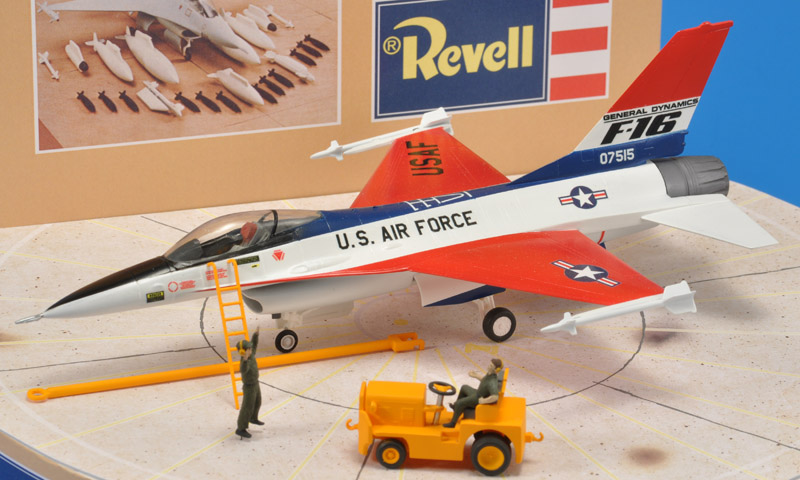
The markings shown here were done according to the USAF standards as outlined in Tech Order 1-1-4, that can be found online. They did not match the Revell designs perfectly, but I preferred the correct markings.

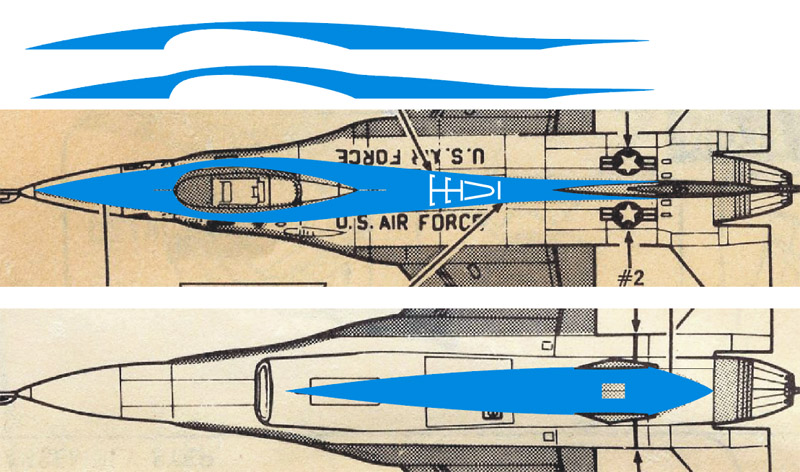
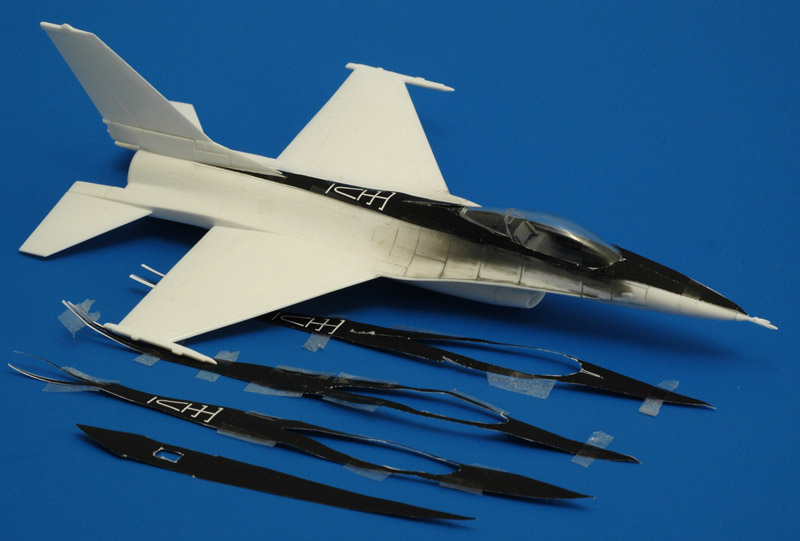
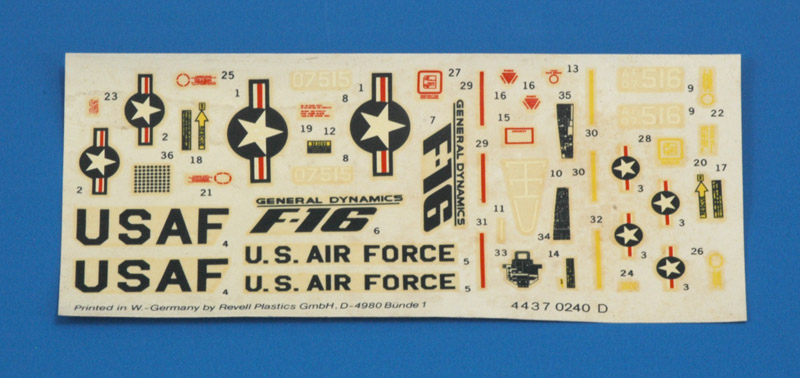
The fact that Revell used a common ink for black and dark blue decals creates a question mark: what color should the 'USAF' and 'U.S. AIR FORCE' texts have? The box photo shows black markings. Tech Order 1-1-4, 1978 and 1994/1998 issues, says in section 3-3 'General specifications for lettering and numerals used in marking of aircraft': "Unless otherwise specified herein, insignia blue, color No 15044, will be used for letters and numerals applied on gray or white surfaces. Gloss black, color No 17875, may be used as a substitute for the insignia-blue. Insignia-white, color No 17925, will be used on red finishes". Therefore, the Tech Order does not help with the color choice, except that the black 'USAF' on the red wing should have been white. In the end I chose black.

Note that the bars in the 'star and bar' designs are slightly offset to the top side, a fact overlooked by many decal designers.

Finding the correct printing colors can be really difficult. The 'insignia blue' in the star-and-bar is very dark, and it took me several attempts to find a good match. But I have no control over what the (outsourced) printer does with the colors, so it remains difficult.
The remainder had to be drawn by hand over the scan. This varied from a done-in-five-seconds warning stripe, to a highly detailed cockpit panel that took half an hour.

The yellow markings were probably orange on the real aircraft. For the first print, I decided to keep the decals yellow, but they can be changed to orange easily of course. My first guess would be FS 33538, a warm yellow.
For completeness, I also added the decal numbers. I combined decals 10 and 11, for my own convenience. I don't know why Revell would split those air refueling markings.
Spotmodel printed my design, and it has vibrant colors, a big difference with the original sheet.

In 2022-2023, an interesting story behind the markings surfaced. In the YF-16 restoration Fort Worth Aviation Museum videos, it is reported that General Dynamics deliberately applied oversize insignia and USAF markings, to make the aircraft look smaller. They suggested the size of the Navy F-4 wing stars and bars was used, but at 45" star diameter they are far bigger than the 28" version on the Revell decal sheet. However, the fuselage insignia were 30" star diameter, so that is close, and maybe the Revell sheet is slightly undersized.
A total transformation occurred when I applied the custom decals- from a weird color scheme to an iconic prototype fighter from the seventies. Wow.

Decaling went smooth. As usual, I added some Future under each decal, then carefully brushed the wetness under each decal outwards. The decals wrinkled (bubbled ?) for maybe an hour, then pulled smooth.

I had some doubts about the Revell instructions, specifically decals locations, but I followed them closely nevertheless. Decals 29 (turbine warning stripes) were too short to cover the lower sides of the 'fuselage shelves', so I cut them short, so they only cover the cilindrical part.

MRP-048 Super Clear Gloss was used as a clear coat. It didn't come out as shiny as the product name suggests, and that was fine with me.


Ground equipment

I assembled the tractor as instructed. It has lots of mold draft angles, and I sanded the parts quite extensively to create flat surfaces. I was initially puzzled by the tractor's offset front bumper plate, leaving a gap to the engine cover, but the similar Clarktor-6 had it too. The ladder and tow bar were just cleaned up and painted. I lost a hand of the guy on the tractor, let's see if I can find a spare one in my spares box!

Later I found three photos of the real thing in 'Strategic Reconnaissance 1956-1976', pages 141, 189 and 219. I guess it's part of the 'Clarktor-6' family (another photo here). Videoaviation sells a 1/48 version. Aircraft Tug question on Britmodeller. The 'Revell version' of this tractor is also seen in Ryan Aeronautical Model 147 Firebee delivery prep, flight test,recovery starting at the 5:48 mark, and in Ryan model 147 TE/TF at Oloa AFB April 1973 starting at the 11:32 mark.

In the Nederlands Instituut voor Militaire Historie - Beeldbank I found three more photos of variants of this little tractor. The oldest is a WW2 vintage KNIL B-25 Mitchell met tractor, the other two are from 1959 RNLAF: Gronduitrusting voor een F-84F (1) and Gronduitrusting voor een F-84F (2). I think I see double wheels at the rear, which makes more sense than the very wide single wheels of the Revell model.
The tractor was slightly modified: most wheel positions were crooked, and I shimmed the axle holders to change the positions.

I painted the wheels chrome yellow overall (Revell 310), then used circular masks of 6.0 and 3.9 mm diameter to paint the tires Revell 9 coal black. The masks were cut on a Silhouette Portrait, and once removed I could see the small masks were quite unround. Hence the masking of the small wheels looked a bit rough. I painted the figures Revell 9 too, and now I could see how well they are detailed! The lost hand was replaced with the arm from a Preiser figure.

I later repainted the front wheels, using 4.0 mm diameter masks made with a Waldron Punch & Die set
The two figures in the kit turned out to be surprisingly nice. The posture of the tractor driver is a bit strange, like he's wondering what the other guy wants. And the marshalling guy seems to have two left hands.. I painted them Humbrol 116 green as a starting point for the rest of the painting.
The figures looked a bit boring, so I started thinking what could be added. Maybe rank insignia and a name and US AIR FORCE tag? I looked at Hasegawa's 'US pilot/ground crew set' (X72-7) but this set does not include any of this. I drew these markings (for two ranks) in CorelDraw and positioned them over the figures to size them. But I don't know whether they are suitable for a mid-seventies setting.

After input from ARC forum members, I swapped the USAF and name tags, made them blue and a bit taller. Internet photos inspired to add a patch on the right breast pocket. I picked the Air Force System Command, that seemed suitable to a new aircraft type. I changed the rank insigna to dark purple, the closest the printer can do the real color of dark blue. Lastly I added a watch for the tractor driver.
I painted the figures before I started using a Japanese equivalent of an Optivisor - and this merciless scan shows it! Time to repaint the faces..


Finished model

The finished model achieved the goal of representing the box art model. Since weathering did not exist yet at that time, I did not weather the model. And that makes it look toy-ish.
The colors and markings are a bit of a hybrid of the box art, the supplied decals, and the real thing, whether it was an YF-16 or an FSD F-16A. I did not copy the black walkway lines shown on the box, since no decals were provided.
Whatever the markings represent, the color scheme does look nice I think! Hat off to the original designer at General Dynamics.
The revenge of the cockpit dirt: even after cleaning out the cockpit during the canopy restoration, some white dirt reappeared in the cockpit. I had to buff the canopy a bit to clean of masking residue, and that made it static. Hence the dirt specks are now attached to the canopy - of course, of course..


Shop display

The reason for building this old model was the shop displays theme for our club table at Euro Scale Modeling 2023. The shop display itself was the second that I designed, and the one that convinced me that this was a feasible theme. I could just picture this in a 1976 shop window, it looked so natural.
I decided to copy the circular compass swinging base, as shown on the right side of the box, and copy all of the left side of the box in the card. Laboriously I determined all fonts (thanks Whatthefont), and rearranged the elements.
A close-up of the models of this shop display. Of course I arranged everything like on the box art. I'm curious how many will spot that.


Inspiration


Modeling links


Return to models page