![]() Modelling a JR West class 419 EMU
Modelling a JR West class 419 EMU
> main > modeller's corner > 419 emu>
Model built by: Bob Hunter
Article by Mark Veneman and Bob Hunter, drawings by Bob Hunter
This article was
originally written for Bullet-In, the club magazine of the Japanese Railway Society.
Used with permission of the JRS.
The JR West 419 class could be one of the ugliest trains in Japan but with its different ends and its makeshift appearance it has lots of character . The 419 is used for slower services between Maibara and Toyama on the Hokuriku mainline and on other routes. 419’s are also used on Kyushu on different routes. There is also an AC only version, the 715, used on both Kyushu and JR East systems.
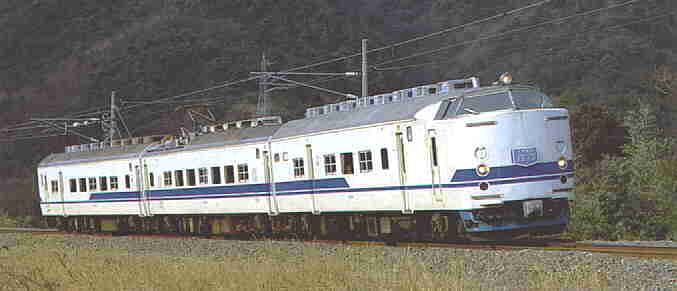
A JRWest 419 class EMU, in 'Town' livery, as used on the Hokuriku mainline (Osaka-Maibara-Toyama).
Why
converting long distance stock for other use?
The 419 class is made up of
converted 583 class sleeping car EMU’s, as they became
redundant due the opening of the Joetsu and Tohoku shinkansen
routes, causing a fall in demand for overnight trains. The
583’s were in a good shape and as there was a need for
trains to run all-staion services on longer routes, the
583’s were converted into suburban (or commuter) trains. The
shape of the 583’s changed dramatically. The trains were
formed into 3 or 4 car sets, and a new ‘cab car’ (Kuha
or Kumoha) was made by seperating a driver’s cab from the
rest of the carriage. This cab has a flat front and the
driver’s seat is not raised as in the original 583 cabs.
Pictures of these cars can be found in the ‘JR
Handbook’.
The model.
As mentioned above, a model of
the 419 can be made out of a Kato 583 sleeping car EMU. The
conversion needs nearly all conversion techniques like splitting
and rejoining body parts, filling in and making extra
windows, adding extra details maybe most important, painting. Bob
Hunter made a model of a 419. He used a Kato 583 as a base for
this conversion. For a 3-car unit you will need one Kuhane 583
(ref. 4080), a powered center car with pantographs Mohane
582 (ref. 4081) and a center car Mohane 583 (ref. 4082). Further
components you need are a cab of a 143 MLV (ref. 4021) and the
folding door sections of type 12 carriages. (ref. 5015). All from
the Kato range. For a 3-car unit you need 4 sets of folding
doors. You can take these from 3 type 12 carriages. The whole
conversion will leave you with lots of parts to fill your
scrapbox. Try to find seperate bodies with glazing of the 143 MLV
and the carriages, as you won’t need the chassis and many
parts of the sides. You also need an extra snowplough from a
class 143 MLV.
The Kuha
419
This is the cab car with the original ‘583’ style cab. In real life these units were converted from Kuhane 581 units. Unfortunately Kato only produces a Kuhane 583, so you need to do two conversions in one. First convert the Kuhane 583 into a Kuhane 581 and then convert the Kuhane 581 into a Kuha 419.
Bob made a model as follows.
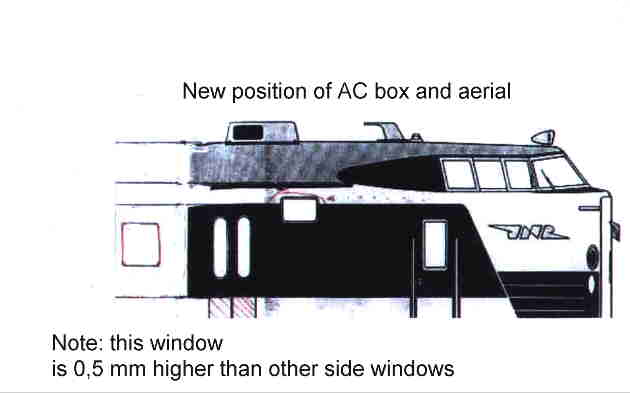
As mentioned above you need to convert the Kato Kuhane 583 into a Kuhane 581 by moving the folding doors away from the cab and filling in some windows. It is best to fill in the folding doors, the capsule windows (the small ones above the large windows) and the service/emergency door, located behind the folding door with ‘Milliput’ filler. Do this on both sides of the car. File/sand off the hatch panel on the right side of the cab. Fill in the window under the cab side window and enlarge the first capsule window to such a size that it accepts the glazing of the window under the cab (destination display). Keep the two capsulewindows at he rear of the car (right side only). On the left side of the car a small square window taken from the power car should be added. You can find this window at the pantograph end of the power car. The first window behind the forward folding door and the second window on the right hand side of the car is almost square. It should sit 0.5mm higher as the other side windows.Please observe pictures in the’JR Handbook’ for details. After you have done the windows, you can add the new folding doors, two on either side, the original ones had been filled in. Again make all joints smooth by filling, filing and sanding.
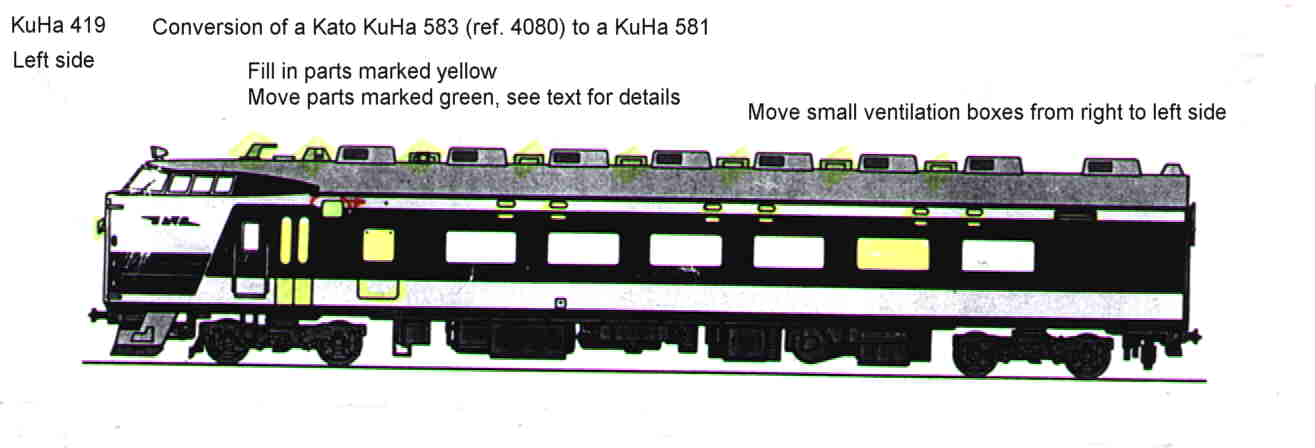
You have to add a panel on the left side of the car, just behind the cab. You can make this panel of 5 thou plasticard, with the grilles scribed in. The size of this panel is 14.5 x 11.5 mm. Have a close look at the drawings and everything gets clear.
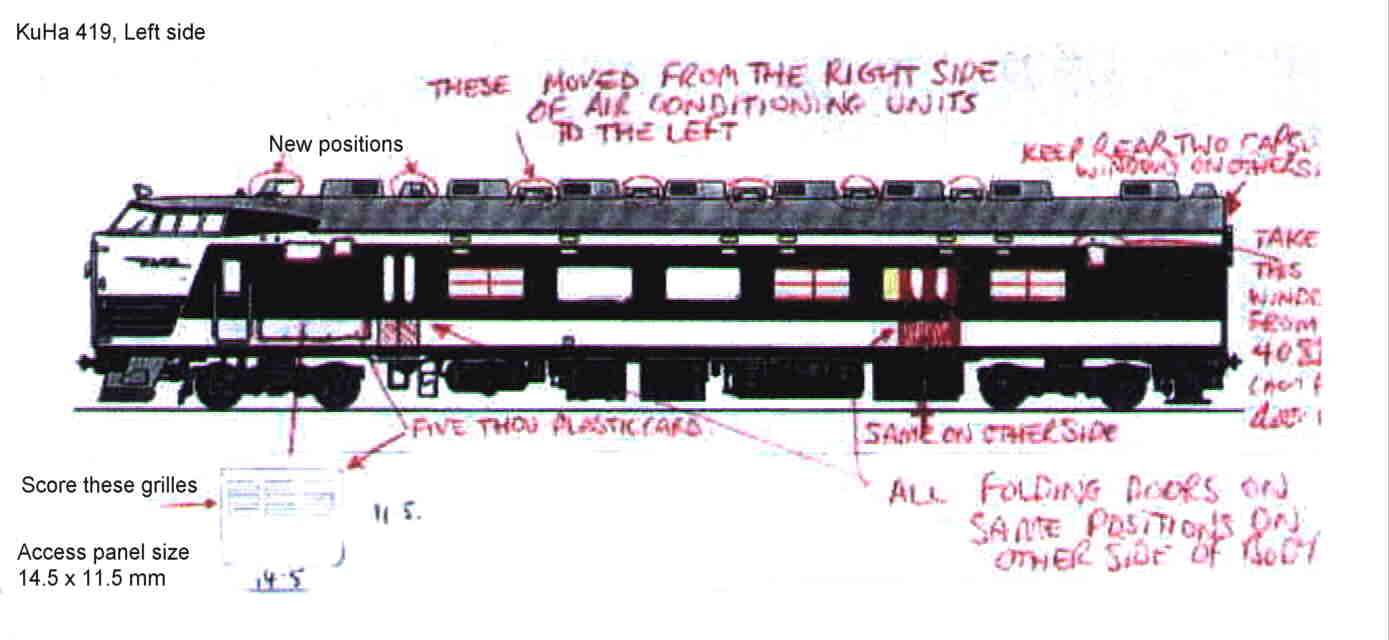
Let’s have a look at the roof now. There is some work needs to be done on the smaller roof vent boxes. They all have to moved from the right side of the airconditioning boxes to the left. Do this by cutting of the vent boxes very carefully and placing them back in the correct position. Two other things to move are the cab aerial and the box just behind it. The aerila has to be moved backwards for about the length of the base. The box needs to be moved to a new loction behind the first air-con box. After this you can test fit the glazing. Keep your model of the ‘Kuha’ 419 apart for painting, as we continue with the central power car.
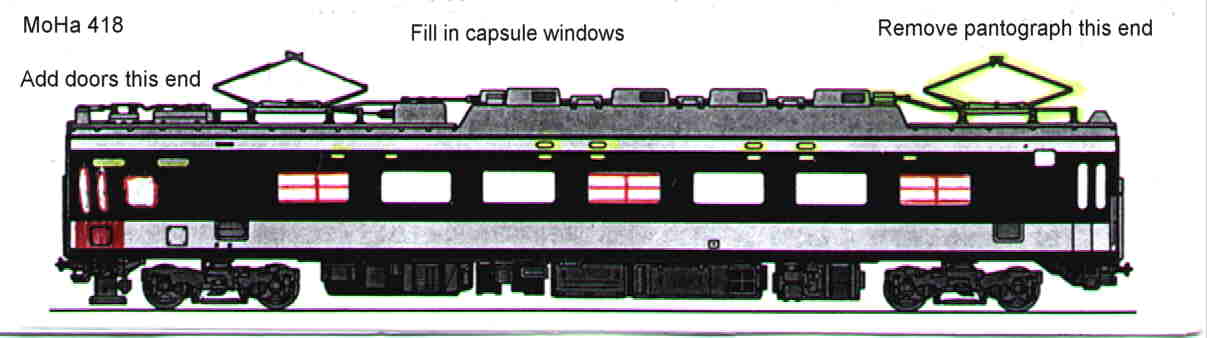
Moha 418
This is the central power car. This car is the easiest conversion and it would be the best to start with.
Firstly, remove all the pantograph equipment from the smaller recess and make all holes smooth. Fill where necessary with ‘Milliput’ or similar filler. Fill in all the capsule windows. Add a folding door and a small square window about 4.2 x 4.2 mm on both sides at the pantograph end (there was one left over). Then you can paint the car and put back the glazing after cutting it into the correct size. Cut off the glazing of the capsule windows and the glazing of filled in windows.(see painting and glazing sections). Add window bars where needed. When painting the cars it is best to do all three (or four) cars in one job.
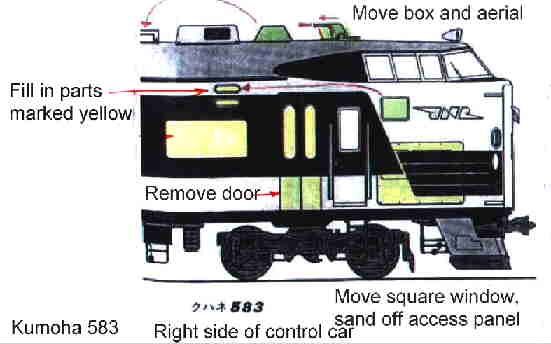
Kumoha 419
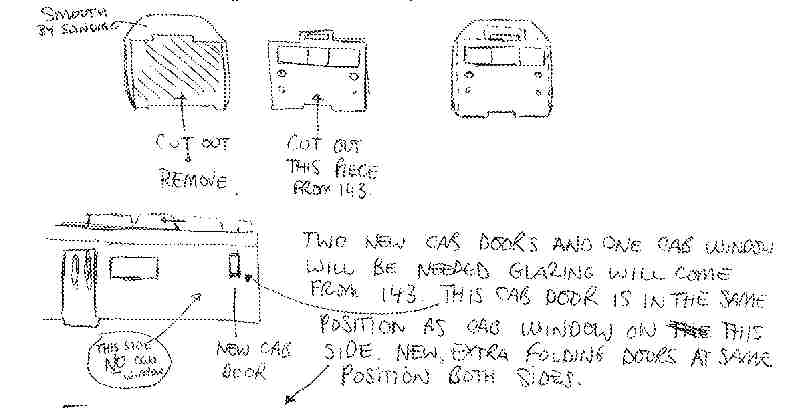
This is the other cab end of the 419 EMU. This car has been converted from a ‘Mohane 583’ non-pantograph centre car. In real life there are two varieties, the Kuha 418 (unmotored) and the Kumoha 419 (motored). The difference is mainly in the underfloor details. The Kuha 418 has only a few underfloor boxes while the Kumoha 419 has many to house the motor control equipment. When converting the Kato 4082 into a Kumoha 419 all the work has to be done on the non-folding door end. Here is where you need the 143 MLV parts. Firstly, cut out the cab front of the 143 MLV. Cut it out of the front, not from the sides. Then cut out an exactly matching part out of the non-folding door end of the Kato 4082 (Kuhane 583). Please observe the diagrams. Then fill and sand where needed. Then add the cab side windows and cab doors, again taken from the 143 MLV. On the right hand side there’s only a cab door, on the left hand side the door is placed further backwards and a side window is added, as per the diagram. The left side cab window should be opposite the right side cab door.
Next step is to fill in all capsule windows (again!!), fill in the third window (second when the cab is installed) from the non-folding door end, file/sand of the two small hatches.
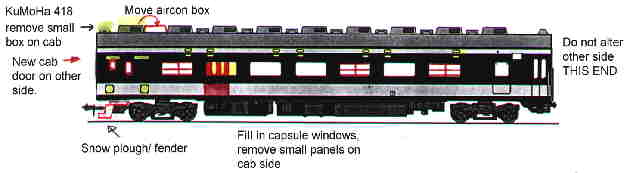
Then you can add a set of folding doors on each side. These should be added in the position of the filled in side window. Please observe the diagram. On the roof you need to move the box above the cab towards the first air-con box as per the diagram. Romove the small box above the cab end.
Finally add the snow fender to the cab-end bogie. Be sure that the snow fender has enough clearance when swinging out in curves.
Electrical
things
When you are really careful you can have working headlights
in this car. Use the headlight circuit board of the 143 (only
when you bought a complete 143 MLV). It is possible to make
headlights more or less scratchbuilt. Plastic ‘light
conductors’ are available in a variety of diameters. With
the right pick-up strips, some wire a clear and a red miniature
buld and two diodes you can add working head and tail lights. The
pick-up srtips may be already installed in the bogies.
When you want something really
exclusive, you can have a DCC decoder ( Digitrax, Lenz, Zimo and similar
systems) built into your model. When you use a small-sized
decoder, there’s room enough under the roof and above the
windows. There are also special ‘function decoders’ for
controlling the head- and taillights. AFAIK there are only a few
modellers who have installed a DCC system on their Japanese
outline N-scale layout. In HO DCC is getting popular over here on
the European Continent and in the USA. I will leave the decision
to use DCC or not up to you.
Liveries
and painting.
The 419 class had run in several liveries, depending on the area
and period. The ones used on the Hokuriku main line were painted
in a dark red colour with a white waistband when introduced in
1981 or 1982. From 1989 onwards the y were repainted in white
with a blue wastband/stripe. The wastband does not run along the
whole lenght of the train, but is only present at the ends and
comes back from approximately half-way the sides of the end cars.
Please observe a picture for a good idea of what I mean.
Other liveries are white with one blue waistband (719, JR Kyushu) and cream with a green stripe (JR East).
Green Max has the right paints
in its collection, but may be not available outside Japan. Then
you have to find matching colours from other manufacturers. White
won’t be a problem, but the right shade of blue can be. The
blue used on the 419 is rather bright, but darker then
‘Conrail blue’. Take a JR handbook to your model shop
when you are shopping for paint and (very important) compare the
colours in natural light. Fluorescent lights as used in shops can
give a wrong impression of a colour!
Glazing
You need to cut up the original
glazing inserts and the put them back in teh correct windows.
Take care when cutting and placing the smaller windows. Add
window bars where needed (as per the diagrams) before putting the
glazing in the cars. Bob Hunter used ‘Fox Transfers’
blue/grey carriage white lines ‘OO’ scale (4mm/foot).
These are decals (wet decals AFAIK). If you damage or have lost
the original glazing you can use ‘Krystal Kleer’ by
Microscale to glaze the windows. This stuff is originally made
for glazing brass models, and can be useful for many other
glazing jobs.
Finally
The model was built by Bob Hunter for about ten years ago. Bob had to dig deep in his memory for providing me an idea of how he made this model. Therefore my most sincere thanks have to go to Bob. I chose to do an article on building a 419 because of my interest in modelling the Hokuriku main line, one area of 419 operation.
I have not made an attempt to do
conversion myself yet, but as mentioned above I am interested in
doing so. If there are readers who have questions, remarks etc.
please contact me. I will collect them and forward them to Bob or
try to find an answer in an other way.
Mark Veneman
![]() Modelling
Modelling ![]() Layouts
Layouts ![]() Modeller's
Corner
Modeller's
Corner ![]() Train
Simulators
Train
Simulators ![]() Various
Various